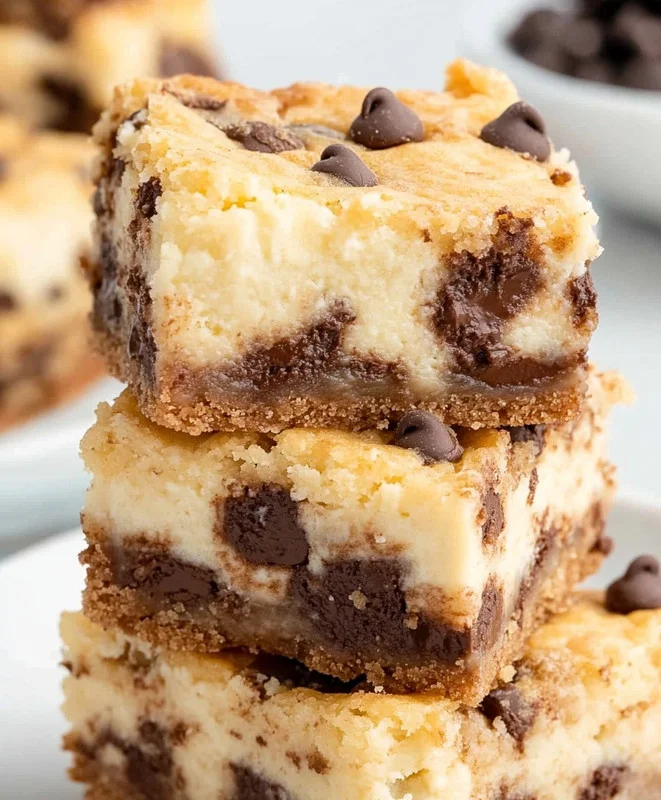
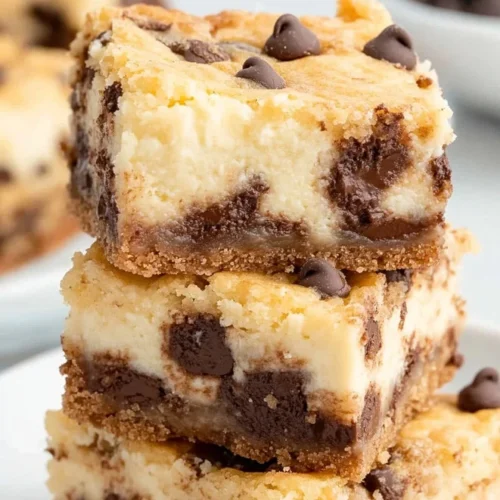
Oh, friend, do you ever get that craving? That deep, comforting yearning for something sweet, something nostalgic, something that just tastes like pure joy? For me, it often comes down to two classic American favorites: chocolate chip cookies and creamy cheesecake. Now, imagine if those two beloved desserts decided to have a delicious little love child. Enter these incredible Chocolate Chip Cheesecake Bars! They’re everything you dream of and more, combining the chewy, chocolatey goodness of a perfect cookie with the tangy, smooth richness of cheesecake, all in one easy-to-make bar. Seriously, these are so quick and simple, you’ll wonder where they’ve been all your life. They’re a memorable treat that’s perfect for sharing, or, let’s be honest, for keeping all to yourself!
Why You’ll Love Chocolate Chip Cheesecake Bars
- Fast: With a shortcut like refrigerated cookie dough, these come together in a flash.
- Easy: No fancy techniques, no water baths, just simple mixing and baking.
- Giftable: Pack them up in a cute box for friends, family, or neighbors – they’re always a hit!
- Crowd-Pleasing: Who can resist chocolate chips AND cheesecake? It’s a guaranteed smile-maker.
Ingredients
Gathering your ingredients for these delightful bars is as simple as the recipe itself. Here’s what you’ll need:
- 1 (16-ounce) roll refrigerated chocolate chip cookie dough: This is your secret weapon for speed and deliciousness! Feel free to grab your favorite brand.
- 8 ounces cream cheese, softened: Make sure it’s at room temperature! This is absolutely key for a smooth, lump-free cheesecake filling. Take it out of the fridge about an hour before you plan to bake.
- ½ cup sugar: Just the right amount to sweeten our creamy filling without making it overly rich.
- 1 egg, room temperature: Like the cream cheese, a room temperature egg incorporates much better, giving you that perfectly silky cheesecake texture.
- ½ teaspoon vanilla extract: A splash of pure vanilla is a must for that warm, inviting flavor in the cheesecake layer.
How to Make Chocolate Chip Cheesecake Bars
Alright, let’s get baking! You’re just a few simple steps away from sinking your teeth into these beauties.
- Get that oven warm: First things first, go ahead and preheat your oven to 350°F (175°C). We want it nice and ready for our bars!
- Prep your pan: Line a 9-inch square baking dish with parchment paper. Leave a little overhang on the sides – this is my favorite trick because it creates “handles” that make it super easy to lift the entire baked slab out of the pan for neat slicing later.
- Create the cookie crust: Take half of that glorious refrigerated chocolate chip cookie dough and press it evenly into the bottom of your prepared baking dish. Don’t be shy; really get in there and press it down firmly to form a solid crust.
- Whip the cream cheese: In a medium bowl, or using your stand mixer, beat the softened cream cheese until it’s wonderfully light and fluffy. This usually takes a couple of minutes.
- Sweeten it up: Add the sugar to your cream cheese and beat it until it’s fully combined and smooth.
- Add the liquids: Now, beat in the room temperature egg and the vanilla extract. Keep beating until the mixture is perfectly smooth and looks like a dreamy, silky cheesecake filling.
- Layer that goodness: Carefully pour your smooth cheesecake filling over the cookie dough base in the baking dish. Gently spread it out evenly with a spatula.
- Crumble on top: Take the remaining half of your cookie dough and crumble it over the top of the cheesecake layer. Don’t worry about perfection here; the rustic crumbles add a lovely texture and visual appeal. This is similar to how you might make a streusel topping, and it’s just as easy!
- Bake to perfection: Pop your baking dish into the preheated oven and bake for 30 to 35 minutes. You’re looking for the cheesecake layer to be mostly set, with maybe just a slight jiggle in the very center, and the cookie dough crumbles to be golden brown.
- Cool and enjoy: Once baked, remove the bars from the oven. This next part is crucial, though hard: you absolutely must allow them to cool completely before attempting to cut them. I know, I know, the smell is intoxicating! But patience here means beautifully clean bars. Once fully cooled, you can lift them out using those parchment paper handles and slice them into perfect squares.
Substitutions & Additions
One of the best things about these Chocolate Chip Cheesecake Bars is how versatile they are! Don’t be afraid to play around and make them your own.
- Switch up the cookie dough: While chocolate chip is a classic, imagine these with peanut butter cookie dough for a delicious twist, or even sugar cookie dough for a more vanilla-forward base. If you’re feeling extra adventurous, you could even try a roll of brownie dough for a decadent fudgy layer.
- Different chocolate, different chips: Instead of regular chocolate chips, try white chocolate chips, dark chocolate chunks, or even a mix! You could also swirl in some caramel or a dollop of raspberry jam before adding the top cookie layer for extra flavor.
- Add some crunch: Sprinkle some chopped nuts (pecans or walnuts would be delightful!) on top with the cookie crumbles for an added textural element.
- A zesty touch: For a brighter cheesecake flavor, add a teaspoon of lemon zest to the cream cheese mixture. If you love citrusy desserts, you might also enjoy making some blueberry cheesecake swirl rolls!
- Flavor extracts: A tiny splash of almond extract or even a hint of mint extract (especially around the holidays!) could transform these bars.
Tips for Success
Even though these bars are super easy, a few little tips can ensure they turn out absolutely perfect every time!
- Room temperature ingredients are a must: I mentioned it in the ingredients, but I can’t stress this enough for the cream cheese and egg. It’s the secret to a smooth, creamy cheesecake filling without any lumps. If you forget, a quick trick for cream cheese is to unwrap it and microwave it for 10-15 seconds at a time until slightly softened. For eggs, place them in a bowl of warm (not hot!) water for 5-10 minutes.
- Don’t overmix the cheesecake: Once you add the egg and vanilla, beat just until everything is smooth. Overmixing can introduce too much air, which can cause cracks in your cheesecake as it cools.
- Parchment paper is your friend: Seriously, those “handles” make cleanup and cutting a breeze. Don’t skip this step!
- Cool completely: This is the hardest part, I know, but trust me! Warm cheesecake bars will be messy and fall apart when you try to cut them. Letting them cool fully, and even chilling them in the fridge for an hour or two, will give you clean, beautiful slices.
- Know your oven: All ovens vary, so keep an eye on your bars toward the end of the baking time. They’re done when the edges are set and the center has just a slight wobble. Overbaking can lead to a dry cheesecake. If you’re looking for another fantastic bar recipe that’s easy to bake, check out these easy sweet potato pie bars!
How to Store Chocolate Chip Cheesecake Bars
These delightful bars are best when they’re fresh, but they store beautifully too, so you can enjoy them for days!
- Refrigeration: Due to the cream cheese, these bars need to be stored in the refrigerator. Place them in an airtight container to keep them fresh and prevent them from absorbing any fridge odors.
- Shelf life: When stored properly in the fridge, these Chocolate Chip Cheesecake Bars will stay delicious for 3 to 5 days.
- Freezing: Yes, you can freeze them! If you want to make a big batch or save some for later, wrap individual bars tightly in plastic wrap, then place them in an airtight freezer-safe container or bag. They’ll keep well in the freezer for up to 1 month. When you’re ready to enjoy, simply thaw them in the refrigerator for a few hours or at room temperature for about 30 minutes.
FAQs
Got a few lingering questions? I’m here to help!
Q: Can I use homemade cookie dough instead of refrigerated?
A: Absolutely! If you have a favorite homemade chocolate chip cookie dough recipe, go for it! Just make sure it’s well-chilled so it’s easy to press into the pan and crumble on top. You might also like to use your homemade dough for peanut butter lunch lady cookie bars!
Q: How do I know when the cheesecake bars are perfectly baked?
A: Look for the edges of the cheesecake to be set and slightly puffed, while the very center might still have a slight jiggle when you gently shake the pan. The cookie crumbles on top should be golden brown.
Q: Can I double this recipe for a larger crowd?
A: Yes! You can easily double the recipe and bake it in a 9×13-inch baking dish. The baking time might be slightly longer, around 40-50 minutes, so keep an eye on it.
Q: What’s the best way to cut these bars cleanly?
A: The key is to make sure they are completely cooled, preferably chilled in the fridge for an hour or two. Use a sharp knife and wipe the blade clean with a damp cloth between each cut for the neatest slices.
Follow us on Pinterest for more delicious recipes and kitchen inspiration!
Chocolate Chip Cheesecake Bars
Equipment
- oven
- 9-inch square baking dish
- parchment paper
- Medium bowl or stand mixer
- Spatula
- sharp knife
Ingredients
- 1 roll refrigerated chocolate chip cookie dough (16-ounce)
- 8 ounces cream cheese softened
- 1/2 cup sugar
- 1 egg room temperature
- 1/2 tsp vanilla extract
Instructions
- Step 1: Get that oven warm: First things first, go ahead and preheat your oven to 350°F (175°C). We want it nice and ready for our bars!
- Step 2: Prep your pan: Line a 9-inch square baking dish with parchment paper. Leave a little overhang on the sides – this is my favorite trick because it creates "handles" that make it super easy to lift the entire baked slab out of the pan for neat slicing later.
- Step 3: Create the cookie crust: Take half of that glorious refrigerated chocolate chip cookie dough and press it evenly into the bottom of your prepared baking dish. Don't be shy; really get in there and press it down firmly to form a solid crust.
- Step 4: Whip the cream cheese: In a medium bowl, or using your stand mixer, beat the softened cream cheese until it's wonderfully light and fluffy. This usually takes a couple of minutes.
- Step 5: Sweeten it up: Add the sugar to your cream cheese and beat it until it's fully combined and smooth.
- Step 6: Add the liquids: Now, beat in the room temperature egg and the vanilla extract. Keep beating until the mixture is perfectly smooth and looks like a dreamy, silky cheesecake filling.
- Step 7: Layer that goodness: Carefully pour your smooth cheesecake filling over the cookie dough base in the baking dish. Gently spread it out evenly with a spatula.
- Step 8: Crumble on top: Take the remaining half of your cookie dough and crumble it over the top of the cheesecake layer. Don't worry about perfection here; the rustic crumbles add a lovely texture and visual appeal.
- Step 9: Bake to perfection: Pop your baking dish into the preheated oven and bake for 30 to 35 minutes. You’re looking for the cheesecake layer to be mostly set, with maybe just a slight jiggle in the very center, and the cookie dough crumbles to be golden brown.
- Step 10: Cool and enjoy: Once baked, remove the bars from the oven. Allow them to cool completely before attempting to cut them. Once fully cooled, you can lift them out using those parchment paper handles and slice them into perfect squares.