
Remember those magical afternoons spent creating something beautiful with just a few simple things? There’s something incredibly heartwarming about hands-on art, especially when it’s as delightful and easy as bubble painting. This activity brings back those childhood memories while creating vibrant, unique pieces of art that you’ll be proud to display or even gift. Get ready to dive into a world of color and bubbles – it’s an explosion of fun that’s perfect for a rainy day, a weekend craft session, or just a moment of creative escape.
Why You’ll Love Bubble Painting Art
- Fast: You can whip up a batch of colors and start creating in minutes!
- Easy: The steps are so simple, even the littlest artists can join in.
- Giftable: Frame your finished pieces for a truly thoughtful and handmade present.
- Crowd-pleasing: Whether it’s for a birthday party or a family gathering, everyone loves playing with bubbles!
Ingredients
Here’s what you’ll need to bring this bubbly masterpiece to life:
- 2–3 tablespoons dish soap or tear-free baby wash per color: This is our secret ingredient for extra foamy fun! A gentle baby wash is perfect if you have sensitive little ones.
- 1/4 cup water per color: Just enough to get the mixture going.
- A few drops of liquid watercolors or food coloring per color: This is where the magic happens! Watercolors give a beautiful, translucent effect, while food coloring offers more intense hues.
- Plastic cups or small bowls (one for each color): To hold our colorful bubbly concoctions.
- Straws (one for each color): Our trusty tools for blowing those glorious bubbles.
- Heavyweight paper (watercolor paper or cardstock): This sturdy paper will hold up to the moisture and give you beautiful prints.
- Optional: aprons or old shirts: Because things might get a little bubbly and colorful – it’s all part of the fun!
How to Make Bubble Painting Art
Ready to get bubbling? Follow these simple steps:
Step 1: Prep Your Creative Space
First things first, let’s get ready! Lay down some newspaper or a plastic tablecloth to protect your surfaces. If you’re crafting with kids, now’s the time to pop on those aprons or old shirts to keep everyone’s clothes clean.
Step 2: Mix Your Bubbly Colors
Grab your cups or bowls. For each color you want to create, pour in about 2–3 tablespoons of dish soap or baby wash. Then, add 1/4 cup of water to each. Give it a gentle stir to combine.
Step 3: Add a Splash of Color
Now for the fun part – adding the color! Drip a few drops of your liquid watercolors or food coloring into each cup. Stir gently again. You want to mix it enough so the color is distributed, but try not to over-stir and lose some of that lovely soapiness.
Step 4: Let the Bubbles Bloom
Take a straw and dip one end into one of your colorful mixtures. Hold it over the cup.
Step 5: Blow Gently!
This is the crucial step: gently blow air into the straw. You want to create lots of bubbles that rise over the rim of the cup. It’s super important to remind everyone, especially the little ones, to only blow air and never to suck the liquid back up the straw.
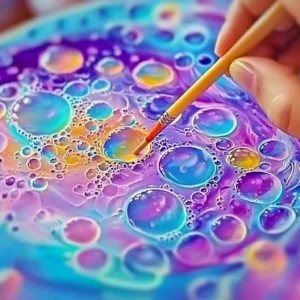
Step 6: Capture the Bubbles
Once you have a nice mound of colorful bubbles, carefully bring your sheet of heavyweight paper down to gently press onto the bubbles. You’re not trying to stir them, just capture their essence and color onto the paper. Lift the paper slowly.
Step 7: Create a Rainbow of Prints
Repeat the process with different colors! You can layer the bubble prints for a really dynamic and unique look. Imagine the vibrant patterns you can create, almost like abstract art. It reminds me a little of the beautiful swirls you can achieve when making [sugar water painting](https://food-knight.com/sugar-water-painting/).
Step 8: Let it Dry
Carefully place your artwork on a flat surface to dry completely. This might take a little while, so be patient! Laying it flat is key to prevent any smudging or colors running into each other.
Substitutions & Additions
Feeling adventurous? Here are some ways to switch things up:
- Different Colors: Don’t have liquid watercolors? Food coloring works wonderfully, just be mindful it can stain surfaces more easily.
- Glitter Magic: For an extra touch of sparkle, add a pinch of fine glitter to your bubble mixture before blowing.
- Scented Bubbles: Add a drop of essential oil (like lavender or orange) to the mixture for a lovely aroma.
- More Bubble Power: A tiny bit of glycerin can make the bubbles even more robust, but it’s not essential for this fun craft.
Tips for Success
Want to ensure your bubble painting art turns out perfectly?
- Don’t over-mix: Gently stir the soap, water, and color to maintain the bubble-making power.
- Gentle blowing: Encourage slow, steady breaths rather than forceful blowing.
- Vary the paper: Experiment with different types of heavyweight paper for slightly different textures and color absorption.
- Prep ahead: You can mix your colors a little bit in advance, but it’s best to have them ready just before you start blowing to maintain freshness.
- Clean up: Have damp cloths or paper towels handy for easy clean-up of any spills or sticky fingers.
How to Store Bubble Painting Art
Once your beautiful bubble paintings are completely dry (this can take several hours depending on humidity and the amount of liquid used), they are ready to be stored or displayed!
- Display: Frame your artwork and hang it on the wall, or use it to create personalized greeting cards.
- Storage: If you’re saving them for later, stack them carefully with a piece of wax paper or parchment paper in between each piece to prevent them from sticking. Store them in a cool, dry place away from direct sunlight to preserve the colors.
FAQs
Can I use regular paint instead of watercolors or food coloring?
While you can experiment with tempera or acrylic paints, they might not mix as well with the soap and water solution and could clog the straws. Liquid watercolors or food coloring are best for achieving vibrant, dispersed color in the bubbles.
How long does the artwork last?
Your bubble paintings should last for years if stored properly and kept out of direct sunlight, which can fade the colors over time.
Is this activity safe for very young children?
Yes, with supervision! Using tear-free baby wash and ensuring they only blow air and don’t ingest the mixture are key. Always supervise young children during any craft activity.
What if I don’t have straws?
You can try using a small spoon or whisk to gently stir the mixture and create bubbles, or even dip the paper directly into the bubbly mixture carefully. However, straws really do create the best, most controlled bubble effects for printing. If you’re looking for other fun, bubbly crafts, you might enjoy [making glow-in-the-dark bubbles](https://food-knight.com/make-glow-in-the-dark-bubbles/) or exploring the science behind [diy bubble painting art](https://food-knight.com/diy-bubble-painting-art/).
We hope you have a fantastic time creating your bubble painting art! If you loved this creative project, be sure to check out our other fun DIYs and recipes. Don’t forget to follow us on Pinterest for more inspiration!
DIY Bubble Painting Art
Equipment
- Plastic cups or small bowls
- Straws
- Heavyweight paper
- Newspaper or plastic tablecloth
- Aprons or old shirts (optional)
- Damp cloths or paper towels
- Wax paper or parchment paper (for storage)
Ingredients
For each color:
- 2–3 tablespoons dish soap or tear-free baby wash per color
- 1/4 cup water per color
- A few drops liquid watercolors or food coloring per color
- Optional: fine glitter for scented bubbles
- 1 drop essential oil for scented bubbles (optional)
- A tiny bit glycerin for more bubble power (optional)
Instructions
- Step 1: Prep your creative space by laying down newspaper or a plastic tablecloth. Put on aprons or old shirts if using.
- Step 2: For each color, pour 2–3 tablespoons of dish soap/baby wash and 1/4 cup of water into separate cups/bowls. Stir gently.
- Step 3: Add a few drops of liquid watercolors or food coloring to each cup. Stir gently to distribute the color.
- Step 4: Dip one end of a straw into a colorful mixture. Hold it over the cup.
- Step 5: Gently blow air into the straw to create bubbles that rise over the rim of the cup. Remember to only blow and not suck the liquid back up.
- Step 6: Carefully bring your heavyweight paper down to gently press onto the mound of bubbles, capturing their color onto the paper. Lift the paper slowly.
- Step 7: Repeat with different colors, layering prints for a dynamic look. Experiment with different paper types.
- Step 8: Place your artwork on a flat surface to dry completely. Store with wax paper between pieces if stacking.