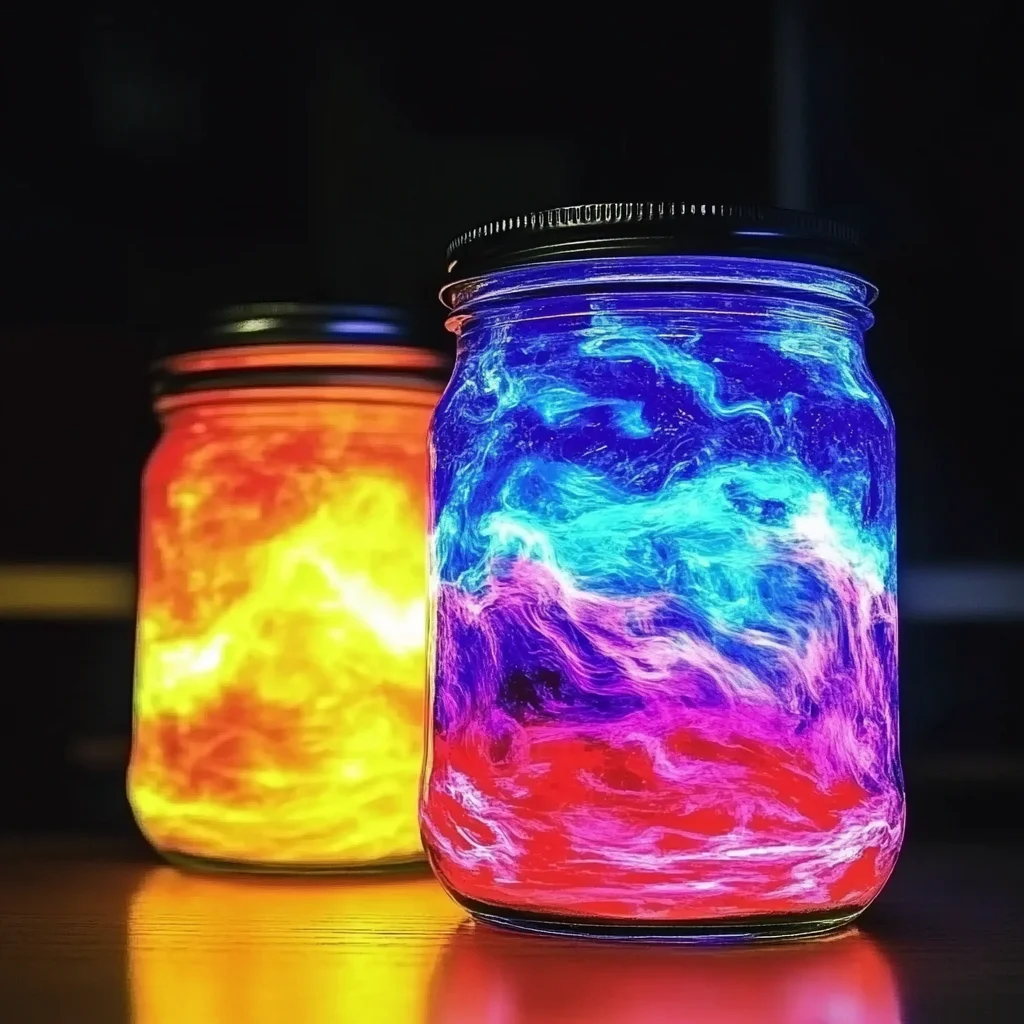
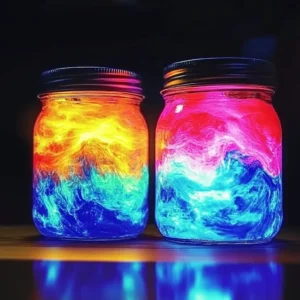
Remember those classic lava lamps from the 70s and 80s? The way the blobs of color would gently rise and fall, creating a mesmerizing, almost hypnotic display? Well, get ready to relive that magic right in your own kitchen with a super simple, totally DIY version! These DIY Color-Changing Lava Lamp Jars are an absolute blast to make and even more fun to watch. They’re perfect for a rainy afternoon, a science-themed party, or even as a unique handmade gift. Plus, they are incredibly easy to whip up, making them a win-win for crafters and non-crafters alike!
Why You’ll Love DIY Color-Changing Lava Lamp Jars
- Fast: You can have one of these bubbly wonders ready in just minutes!
- Easy: Seriously, if you can pour and stir, you can make these.
- Giftable: Package them up with a cute ribbon and you’ve got an awesome homemade present.
- Crowd-pleasing: Kids and adults alike are fascinated by the bubbling action and shifting colors.
Ingredients
Gather ’round, friends, because you probably have most of these household staples already!
- 1/2 cup clear vegetable oil: This is our main base, giving the lamp its distinct layers.
- 1/4 cup water: The watery part where all the magic happens!
- 1 tablespoon dish soap: This is the secret ingredient that helps the colors bubble and move.
- Food coloring (multiple colors): Get creative with your colors! Red, blue, yellow, green – the more, the merrier!
- 1/4 teaspoon baking soda: This is one of our “activators” that reacts with the other key ingredient.
- 1/4 teaspoon citric acid: The other “activator” that makes all the bubbly goodness happen. You can usually find this in the canning aisle or online.
- 1 small jar or clear plastic bottle: Make sure it’s clean and has a lid or can be easily sealed. A recycled water bottle or a small mason jar works perfectly!
- 1 spoon or craft stick: For a little gentle stirring.
- 1 small funnel (optional): This can make pouring the liquids a bit cleaner, especially if you’re using a bottle with a narrow opening.
How to Make DIY Color-Changing Lava Lamp Jars
Alright, let’s get our hands a little messy and create some science magic! It’s really as simple as following these steps.
- Layer the liquids: First, carefully pour the clear vegetable oil into your jar or bottle. Then, gently add the water on top of the oil. You’ll see they don’t mix, which is exactly what we want!
- Add the bubbly element: Now, stir in the dish soap. This will help the colors interact with the water and create those cool “lava” effects.
- Color explosion! Add a few drops of your chosen food coloring to the water layer. Don’t stir too vigorously here; just a gentle swirl will do. Imagine creating your own little underwater world!
- Prepare the activator: In a separate tiny bowl, mix the baking soda with just a tiny splash of water to form a thick paste. Then, using your spoon or funnel, carefully add this baking soda paste into your jar.
- Spark the reaction: Time for the grand finale! Sprinkle the citric acid into the mixture.
- Watch the magic unfold: Stand back and observe! You should start seeing colorful bubbles rise and fall, creating that awesome lava lamp effect. It’s like a mini science experiment right before your eyes!
Substitutions & Additions
Feeling a bit adventurous? You can totally play around with this recipe!
- Glitter: For an extra touch of sparkle, add a pinch of fine glitter along with the food coloring. It adds a really magical shimmer!
- Different Containers: While jars and bottles are great, you could also try clear plastic cups for a different look.
- Food Coloring Combos: Experiment with mixing colors! Try making yellow and blue to see if you get a green reaction, or layer different colors to see how they interact. If you’re feeling really creative, you might even want to explore making some fun layered drinks like our Summer Pineapple Lemonade Punch!
- Citric Acid Alternatives: While citric acid is best, in a pinch, a little bit of Alka-Seltzer tablet crushed up can also create a similar bubbling reaction, though the effect might be more rapid.
Tips for Success
A few little tricks can help make your lava lamp jars even more spectacular!
- Gentle Mixing: When adding the food coloring, try to stir it only into the water layer, not through the oil. This helps maintain the separation.
- The Paste is Key: Making the baking soda into a paste helps it sink to the bottom more effectively, ensuring a better reaction when the citric acid is added.
- Seal it Tightly: If you want to keep your lava lamp for later, make sure the jar or bottle has a good seal. This recipe is for a temporary, active reaction.
- Cleanliness Counts: Using a clean jar or bottle is important to prevent any cloudiness or unwanted reactions.
- Experiment with Amounts: While these amounts are a great starting point, don’t be afraid to slightly adjust the baking soda or citric acid to see how it changes the bubbling intensity. Think of it like tweaking ingredients for a new recipe – maybe you’ll discover your perfect balance!
How to Store DIY Color-Changing Lava Lamp Jars
These DIY lava lamp jars are designed to be a temporary science experiment and create their bubbly magic when the baking soda and citric acid react. Once the reaction has finished, the liquids will remain separated but won’t bubble on their own.
If you want to “reactivate” them, simply add a little more citric acid! However, if you’re just storing them for display without the bubbling effect, just make sure the lid is on securely. They make a pretty cool, colorful decoration even when they’re not actively bubbling. Just remember, the fizzing magic is a reaction, not a continuous state.
FAQs
Q: How long does the bubbling effect last?
A: The bubbling effect is a chemical reaction between the baking soda and citric acid. It typically lasts for a few minutes, creating a fun, dynamic display. You can reactivate it by adding more citric acid.
Q: Can I reuse the mixture?
A: You can reuse the mixture by adding more citric acid to kickstart the reaction again. However, over time, the water and oil might emulsify slightly, and the colors might not be as vibrant.
Q: Is this safe for young children?
A: Yes, this is a very safe activity for children, but as with any craft or science experiment, adult supervision is always recommended, especially when handling the smaller ingredients like baking soda and citric acid. It’s a great hands-on way to learn about chemical reactions, similar to how some of our baking soda experiments for kids work!
Q: Can I make this permanent?
A: This specific recipe is designed to be a temporary reaction. For a more permanent “lava lamp” effect, you’d typically use a different method involving heated oil and wax, which is a more involved process. This DIY version is all about the quick, fun, fizzy science! It’s a lot like making simple treats; sometimes the easy, temporary fun is just what you need, like our Easy 2-Ingredient Mini Peach Pies.
Don’t forget to follow us on Pinterest for more fun DIYs and delicious recipes!
DIY Color-Changing Lava Lamp Jars
Equipment
- Small jar or clear plastic bottle
- Spoon or craft stick
- Small funnel (optional)
- Tiny bowl
Ingredients
For the Lava Lamp Jars
- 0.5 cup clear vegetable oil
- 0.25 cup water
- 1 tablespoon dish soap
- Several drops food coloring (multiple colors)
- 0.25 teaspoon baking soda mixed with a tiny splash of water to form a paste
- 0.25 teaspoon citric acid
- Pinch fine glitter (optional) for extra sparkle
Instructions
- Step 1: First, carefully pour the clear vegetable oil into your jar or bottle. Then, gently add the water on top of the oil. You’ll see they don’t mix, which is exactly what we want!
- Step 2: Now, stir in the dish soap. This will help the colors interact with the water and create those cool ‘lava’ effects.
- Step 3: Add a few drops of your chosen food coloring to the water layer. Don’t stir too vigorously here; just a gentle swirl will do. Imagine creating your own little underwater world! Add optional glitter now if desired.
- Step 4: In a separate tiny bowl, mix the baking soda with just a tiny splash of water to form a thick paste. Then, using your spoon or funnel, carefully add this baking soda paste into your jar.
- Step 5: Time for the grand finale! Sprinkle the citric acid into the mixture.
- Step 6: Stand back and observe! You should start seeing colorful bubbles rise and fall, creating that awesome lava lamp effect. It’s like a mini science experiment right before your eyes!