
Oh, friend! Do you remember those moments as a kid, eyes wide with wonder, believing in a little bit of magic? Whether it was fireflies dancing in the twilight or sparkly craft projects that felt straight out of a storybook, there’s just something special about capturing a little bit of that enchantment. Well, get ready, because I’m going to show you how to bring a touch of that magic right into your home with the easiest, most captivating craft ever: the Fairy Jar!
This isn’t a recipe you eat, but it’s a recipe for pure joy! It’s incredibly simple, takes mere minutes to put together, and the result is absolutely mesmerizing. Perfect for a rainy afternoon craft session, a unique homemade gift, or just adding a little sparkle to your shelf. Seriously, you’re going to love how quick and memorable this is.
Why You’ll Love Fairy Jar
- Fast: You can make one in minutes!
- Easy: So simple, anyone can do it.
- Giftable: A handmade gift filled with magic? Yes, please!
- Crowd-pleasing: Kids and adults alike are captivated by the glow.
Ingredients
Gather your supplies! You only need three simple things:
- Mason jar: Any size will do, but a small or medium one works great. Make sure it has a lid that screws on tight!
- Glitter: Fine or chunky, iridescent or metallic – whatever color or style sparks your imagination! The more, the merrier for maximum sparkle.
- Glow stick: A standard, single-use glow stick. Pick your favorite color!
How to Make Fairy Jar
Alright, let’s conjure some magic! This is seriously simple, but remember, we’re working with glow stick liquid, so grown-up supervision is a good idea, especially with little helpers!
- Choose Your Sparkle: First things first, pick the color of your glow stick and decide on the glitter colors you want to use. Think about how they’ll look together when it’s glowing!
- Prep Your Space: Lay down an old towel or some newspaper on your workspace. This is your safety net just in case of any little drips or spills from the glow stick.
- Activate the Glow: Bend the glow stick until you hear it snap. Shake it up to get it glowing brightly!
- Carefully Cut: Holding the glow stick vertically over your towel, very carefully use scissors to make a small cut in the very bottom tip of the glow stick. You only need a tiny snip.
- Squeeze the Magic: Gently squeeze the activated glow stick to let the glowing liquid drip into your mason jar. Try to get as much out as you can. This is the “fairy dust” that makes it glow!
- Add the Glitter: Now for the fun part! Dump a generous amount of glitter into the jar. Don’t be shy! The glitter is what catches the light and makes it look truly magical when shaken.
- Seal the Spell: Screw the lid onto the mason jar very tightly. Make sure it’s secure so nothing leaks out when you shake it.
- Shake, Shake, Shake!: Hold the jar securely and give it a good, vigorous shake! Watch as the glitter swirls through the glowing liquid, creating that enchanting, swirling effect.
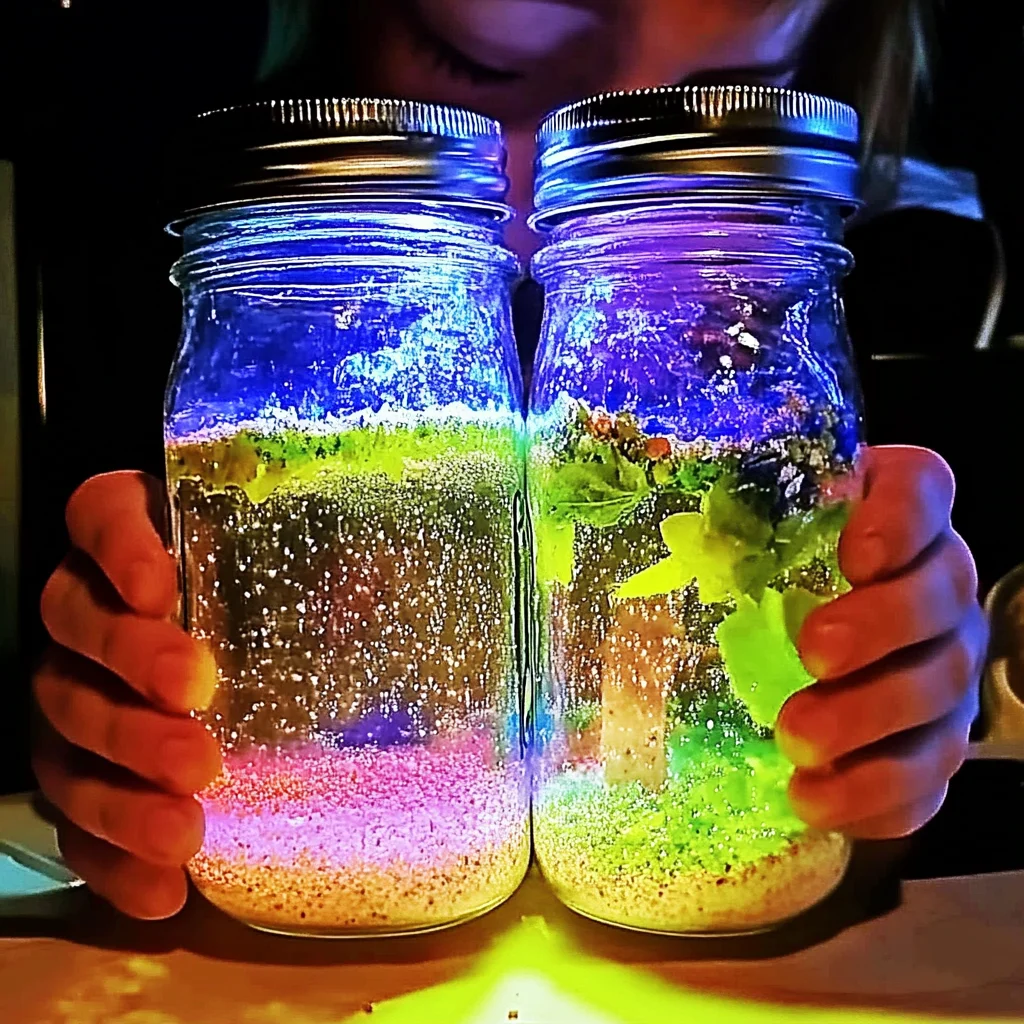
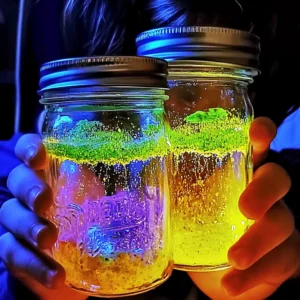
- Behold Your Fairy Jar: Turn off the lights and admire your handiwork! You’ve created a beautiful, glowing fairy jar.
Substitutions & Additions
Want to switch things up? Here are a few ideas:
- Jars: Get creative with different shaped jars or even sturdy plastic bottles. Just make sure the lid seals well.
- Glitter Galore: Mix different sizes and colors of glitter! Add some iridescent flakes, fine powder glitter, or even tiny star or heart-shaped glitter for extra whimsy.
- Beyond Glitter: While glitter is key, you could experiment with adding other tiny, lightweight objects that might swirl, like small plastic beads (make sure they’re very small and don’t clog anything) or sequins.
Tips for Success
This is a pretty foolproof craft, but here are a few pointers from me:
- Safety First: Glow stick liquid isn’t harmful in small amounts, but it’s best not to get it on skin or ingest it. That’s why using the towel is important, and make sure kids are supervised during the cutting and squeezing step.
- Maximize the Glow: Make sure your glow stick is fully activated and bright before cutting it open. The brighter it is to start, the better your jar will glow.
- Shake it Up: The magic really happens when you shake the jar! The glitter needs to be suspended in the liquid to create the swirling effect.
- Make it a Craft Day: Why stop at one? Make several Fairy Jars in different colors! You could even set up a little craft station with other fun activities like making a simple DIY bioplastic suncatchers to hang in a window while your jars glow at night.
How to Store Fairy Jar
Once your Fairy Jar is made, the magic is ready to be enjoyed! Keep the lid screwed on tightly when you’re not admiring it. The glow will last as long as the glow stick is active, usually several hours. When the glow fades, you can shake it again to see the glitter swirl in the non-glowing liquid, or simply keep it as a sparkly decoration. You can also easily make a new one with a fresh glow stick whenever you want to reignite the magic! If you’re feeling extra crafty, you could even paint the lid for a finished look, just like you might decorate the jar for a homemade DIY Mason Jar aquarium project!
FAQs
Is the glow stick liquid safe?
Glow stick liquid isn’t meant to be ingested or put on skin/eyes. This is why adult supervision is important, especially with kids, and why we use a towel to protect the workspace.
How long will the jar glow?
The glow comes from the chemical reaction inside the glow stick, which is usually active for several hours (typically 4-12 hours depending on the stick). The jar itself will remain sparkly from the glitter!
Can I use other liquids besides the glow stick liquid?
For the glowing effect, you need the liquid from the glow stick. Adding water might dilute the glow, and oil-based liquids won’t mix properly. Stick with the glow stick liquid for the best result.
Making a Fairy Jar is such a simple way to add a little sparkle and wonder to your day. It’s a reminder that sometimes, the most magical things are the easiest to create. Why not make a few, maybe sip on some refreshing homemade watermelon lemonade while you craft, and share the magic with friends?
For more fun and easy ideas, be sure to follow us on Pinterest!
Magical Fairy Jar
Equipment
- Mason Jar
- Scissors
- Old towel or newspaper
Ingredients
- Mason jar Any size, with a lid that screws on tight
- Glitter Fine or chunky, iridescent or metallic – generous amount
- 1 Glow stick Standard, single-use
Instructions
- Step 1: Choose your glow stick color and glitter colors, thinking about how they will look together when glowing.
- Step 2: Lay down an old towel or some newspaper on your workspace to protect against spills.
- Step 3: Activate the glow stick by bending it until it snaps, then shake it to make it glow brightly.
- Step 4: Holding the glow stick vertically over your towel, carefully use scissors to make a small cut in the very bottom tip of the glow stick.
- Step 5: Gently squeeze the activated glow stick to drip the glowing liquid into your mason jar, getting out as much as possible.
- Step 6: Dump a generous amount of glitter into the jar.
- Step 7: Screw the lid onto the mason jar very tightly, ensuring it is secure.
- Step 8: Hold the jar securely and give it a good, vigorous shake to swirl the glitter through the glowing liquid.
- Step 9: Turn off the lights and admire your glowing fairy jar.