Remember those cozy winter nights, curled up with a warm blanket and a festive treat? For me, the holiday season always brings back memories of delicious homemade candies, passed around during family gatherings. There’s something truly magical about a sweet bite that instantly transports you back to simpler times. This year, I’ve got a recipe that’s going to become your new favorite tradition: Eggnog Fudge! It’s ridiculously easy to make, comes together quicker than you might think, and tastes like a little piece of holiday heaven. Seriously, if you’ve ever thought fudge was too complicated, this recipe is about to change your mind and make you a fudge-making superstar.
Why You’ll Love Eggnog Fudge
- Fast: Ready in a flash, perfect for last-minute cravings or gifts!
- Easy: No complicated steps or fancy equipment needed.
- Giftable: Makes a beautiful, thoughtful homemade present for friends and family.
- Crowd-pleasing: Who can resist the creamy, spicy goodness of eggnog in fudge form?
Ingredients
Gathering your ingredients is the first step to deliciousness! Here’s what you’ll need for this dreamy Eggnog Fudge:
- ½ cup unsalted butter: The foundation of our creamy fudge. Unsalted gives you control over the saltiness.
- ¾ cup eggnog: The star of the show! Use your favorite brand, or homemade if you’re feeling extra fancy.
- 2 cups granulated sugar: Sweetness and structure, essential for fudge.
- 12 ounces white baker’s chocolate: Don’t use chocolate chips here! Baker’s chocolate melts much smoother for that perfect fudge consistency.
- 2 cups marshmallow crème: This is our secret weapon for super soft and gooey fudge. So much easier than dealing with individual marshmallows!
- 2 teaspoons vanilla extract: A splash of warmth to complement the eggnog.
- 1 teaspoon nutmeg, divided: The classic spice that truly sings with eggnog. We’ll use some in the fudge and some for sprinkling.
How to Make Eggnog Fudge
Alright, let’s get cooking! Follow these simple steps, and you’ll have gorgeous Eggnog Fudge in no time.
- Prep Your Pan: First things first, grab an 8-inch by 8-inch baking dish. Line it with parchment paper so it overhangs the sides – this makes lifting out your fudge a breeze! Give that parchment paper a light spray with cooking spray to ensure absolutely no sticking.
- Boil the Base: In a sturdy, heavy-bottomed saucepan, combine your butter, eggnog, and granulated sugar. Place it over medium heat and bring it to a rolling boil. Once it’s bubbling, reduce the heat slightly to medium-high. Now, here’s the important part: you need to keep stirring constantly! This prevents burning and ensures even cooking. Continue boiling until a candy thermometer reads exactly 234°F (112°C). This is the “soft ball” stage, crucial for perfect fudge texture.
- Melt the Chocolate: As soon as your mixture hits that magic temperature, take the saucepan off the heat. Immediately add your white baker’s chocolate. Stir, stir, stir until it’s completely melted and beautifully smooth. It should incorporate seamlessly into your hot sugar mixture.
- Add the Marshmallow Crème: Next up, spoon in that luscious marshmallow crème. Stir it in really well until it’s fully combined and there are no streaks left. This is what gives your fudge its incredible, melt-in-your-mouth texture!
- Flavor Power: Now for the finishing touches on flavor! Stir in the vanilla extract and ½ teaspoon of the nutmeg. Give it a good mix to distribute those lovely flavors throughout. Remember to reserve the remaining ½ teaspoon of nutmeg for later – it’s for topping! For another easy and delightful sweet treat you might enjoy, check out my recipe for Easy 3-Ingredient Lemon Fudge.
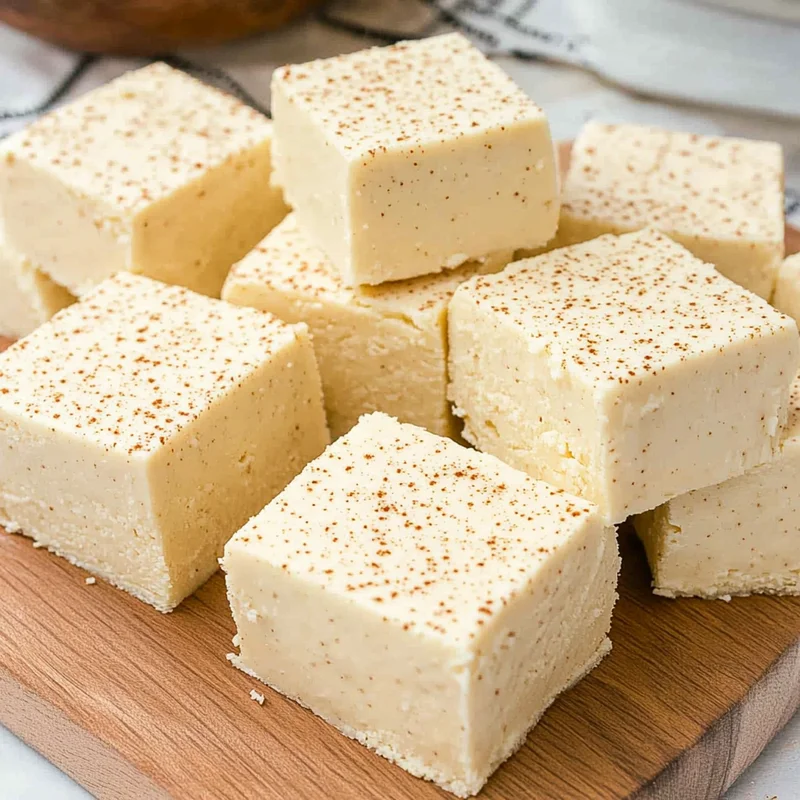
- Set it Up: Pour the fudge mixture evenly into your prepared baking dish. Use an offset spatula or the back of a spoon to smooth out the top.
- The Finishing Sprinkle: Now, take that reserved ½ teaspoon of nutmeg and sprinkle it generously over the top of the fudge. This adds both beautiful visual appeal and an extra burst of classic eggnog spice!
- Chill Time: Pop your baking dish into the refrigerator. Let it chill for at least 4 hours, or even better, overnight. This chilling time is essential for the fudge to firm up properly so you can cut perfect squares. Once it’s firm, simply lift it out of the pan using the parchment paper, slice it into squares, and get ready to enjoy!
Substitutions & Additions
One of the best things about fudge is how versatile it is! Feel free to play around and make this Eggnog Fudge your own. Here are a few ideas:
- Spice It Up: If you want an even bolder spice profile, consider adding a pinch of cinnamon or a tiny bit of ground cloves along with the nutmeg.
- A Little Kick: For an adult-friendly version, you can replace a tablespoon or two of the eggnog with a good quality rum or bourbon extract (or the real stuff, if you prefer!). Just be mindful that adding liquid might slightly alter the consistency, so a little goes a long way.
- Chocolate Swap: While white chocolate gives that classic eggnog look, you could experiment with milk chocolate or even a semi-sweet chocolate for a different flavor profile, though it won’t have the same “eggnog” appearance.
- Mix-Ins: Once the fudge is spread in the pan but before it sets, you could gently press in some chopped pecans, white chocolate chips, or even a sprinkle of festive sprinkles for extra texture and fun! Speaking of festive treats, if you’re looking for more holiday baking inspiration, you absolutely have to try these Easy Christmas Pinwheel Cookies.
Tips for Success
Making fudge is pretty straightforward, but a few insider tips can make all the difference for a perfectly smooth, creamy batch every time:
- Use a Candy Thermometer: This isn’t optional for this recipe. Achieving the correct temperature (234°F or 112°C) is absolutely critical for the fudge to set properly. Too low, and it might be too soft; too high, and it could be crumbly.
- Stir Constantly: When boiling the butter, eggnog, and sugar, keep stirring! This prevents scorching on the bottom of your pan and helps the sugar dissolve evenly.
- Don’t Scrape the Sides: Once you take the fudge off the heat and are stirring in the chocolate and marshmallow crème, try not to scrape down the sides of the saucepan. Any sugar crystals clinging to the sides could cause your fudge to “sugar out” and become grainy.
- Patience is Key for Chilling: I know it’s tempting to cut into it right away, but resist! Those 4 hours (or more) in the fridge are vital for the fudge to firm up completely and achieve that perfect sliceable texture.
- Clean Your Pan Immediately: Hot sugar mixtures can be tough to clean once they cool. As soon as you’ve transferred the fudge, fill your saucepan with hot water and let it soak. It will make cleanup a breeze!
- Consider Different Baking Pans: While an 8×8 is perfect for thicker fudge, you could use a 9×13 for a thinner set. Just make sure to adjust your parchment paper accordingly! If you love easy, delightful sweets like this fudge, you might also enjoy making Homemade Pistachio Brittle for another fantastic homemade gift or personal indulgence.
How to Store Eggnog Fudge
Once your delicious Eggnog Fudge is made and sliced, here’s how to keep it fresh and tasty:
- At Room Temperature: You can store Eggnog Fudge in an airtight container at room temperature for up to 1 week. If your home is very warm, the fridge is a better option.
- In the Refrigerator: For longer storage, keep it in an airtight container in the refrigerator for up to 2-3 weeks. If stacking, place a piece of parchment paper between layers to prevent sticking.
- Freezing: Yes, you can freeze fudge! Wrap individual pieces tightly in plastic wrap, then place them in a freezer-safe bag or container. It will keep well for up to 3 months. Thaw in the refrigerator or at room temperature before serving.
FAQs
Got questions about this delightful Eggnog Fudge? I’ve got answers!
Can I use regular chocolate chips instead of baker’s chocolate?
I highly recommend sticking with white baker’s chocolate for this recipe. Baker’s chocolate is designed to melt smoothly and integrate perfectly into fudge. Chocolate chips contain stabilizers that prevent them from melting as evenly, which can result in a grainy or less creamy fudge texture.
My fudge didn’t set, what happened?
The most common reason for fudge not setting is not reaching the correct temperature (234°F or 112°C) during the boiling stage. A reliable candy thermometer is your best friend here! Also, make sure you let it chill for the full recommended time.
Can I make this recipe ahead of time for holidays?
Absolutely! This Eggnog Fudge is a fantastic make-ahead treat. You can prepare it up to 2-3 weeks in advance and store it in the refrigerator, or even freeze it for up to 3 months. Just thaw and slice when you’re ready to serve.
What if I don’t have eggnog?
While this is an Eggnog Fudge recipe, if you’re in a pinch or it’s not the season, you could try substituting with whole milk or heavy cream and adding extra nutmeg, a dash of vanilla, and perhaps a tiny hint of rum extract to mimic the flavor. However, the true joy of this recipe is that rich eggnog flavor!
For more delicious recipes and kitchen inspiration, be sure to follow us on Pinterest!

Easy Homemade Eggnog Fudge
Equipment
- 8-inch by 8-inch baking dish
- parchment paper
- cooking spray
- Heavy-bottomed saucepan
- Candy thermometer
- Offset spatula or spoon
Ingredients
- 0.5 cup unsalted butter
- 0.75 cup eggnog
- 2 cups granulated sugar
- 12 oz white baker's chocolate Don't use chocolate chips here! Baker's chocolate melts much smoother for that perfect fudge consistency.
- 2 cups marshmallow crème This is our secret weapon for super soft and gooey fudge. So much easier than dealing with individual marshmallows!
- 2 tsp vanilla extract
- 1 tsp nutmeg divided
Instructions
- Step 1: Grab an 8-inch by 8-inch baking dish. Line it with parchment paper so it overhangs the sides, then lightly spray the parchment paper with cooking spray to ensure no sticking.
- Step 2: In a sturdy, heavy-bottomed saucepan, combine butter, eggnog, and granulated sugar. Place over medium heat and bring to a rolling boil. Reduce heat slightly to medium-high, then stir constantly until a candy thermometer reads exactly 234°F (112°C).
- Step 3: Immediately remove the saucepan from heat and add the white baker's chocolate. Stir until completely melted and smooth, incorporating seamlessly into the hot sugar mixture.
- Step 4: Spoon in the marshmallow crème. Stir it in thoroughly until fully combined with no streaks remaining.
- Step 5: Stir in the vanilla extract and ½ teaspoon of the nutmeg. Mix well to distribute the flavors. (Reserve the remaining ½ teaspoon of nutmeg for topping).
- Step 6: Pour the fudge mixture evenly into your prepared baking dish. Use an offset spatula or the back of a spoon to smooth out the top.
- Step 7: Sprinkle the reserved ½ teaspoon of nutmeg generously over the top of the fudge for visual appeal and an extra burst of classic eggnog spice.
- Step 8: Pop the baking dish into the refrigerator for at least 4 hours, or even better, overnight. Once firm, lift the fudge out using the parchment paper, slice into squares, and serve.