Remember those dazzling, jewel-like creations you used to see in science museums or maybe even make in a classroom? Well, get ready to bring that magic right into your own kitchen! This Crystal Growing Experiment is not only incredibly fun, but it’s also surprisingly simple, perfect for a rainy afternoon, a science fair project, or just a little bit of everyday wonder. I remember the first time I saw crystals form, it felt like pure alchemy – and guess what? You can do it too!
Why You’ll Love This Crystal Growing Experiment
- Fast: While the magic happens overnight, the setup is super quick!
- Easy: Seriously, if you can boil water and tie a knot, you can do this.
- Giftable: Imagine gifting these sparkling beauties to friends – talk about a unique present!
- Crowd-pleasing: Kids and adults alike are mesmerized by the crystal growth process. It’s a guaranteed hit!
Ingredients
Gathering your supplies is half the fun! Here’s what you’ll need:
- 3 cups boiling water: The base for our crystal magic. Handle with care!
- 3/4 cup Borax: This is your secret ingredient for crystal formation. You can usually find it in the laundry aisle of your local grocery store.
- 6 Pipe cleaners: These will be the skeletons of your sparkling creations. Any color works, but vibrant ones make for extra dazzling crystals!
- 2 pieces of string: About 12 inches each should do the trick to hang your shapes.
- Popsicle sticks: These are our handy helpers to suspend your shapes in the solution.
- Mason jars or tall glasses: You’ll need one for each crystal you plan to grow.
How to Make Your Own Crystal Growing Experiment
Alright, let’s get down to business and make some magic happen! It’s a straightforward process, and I’ll walk you through it step-by-step.
-
Shape Your Sparkles
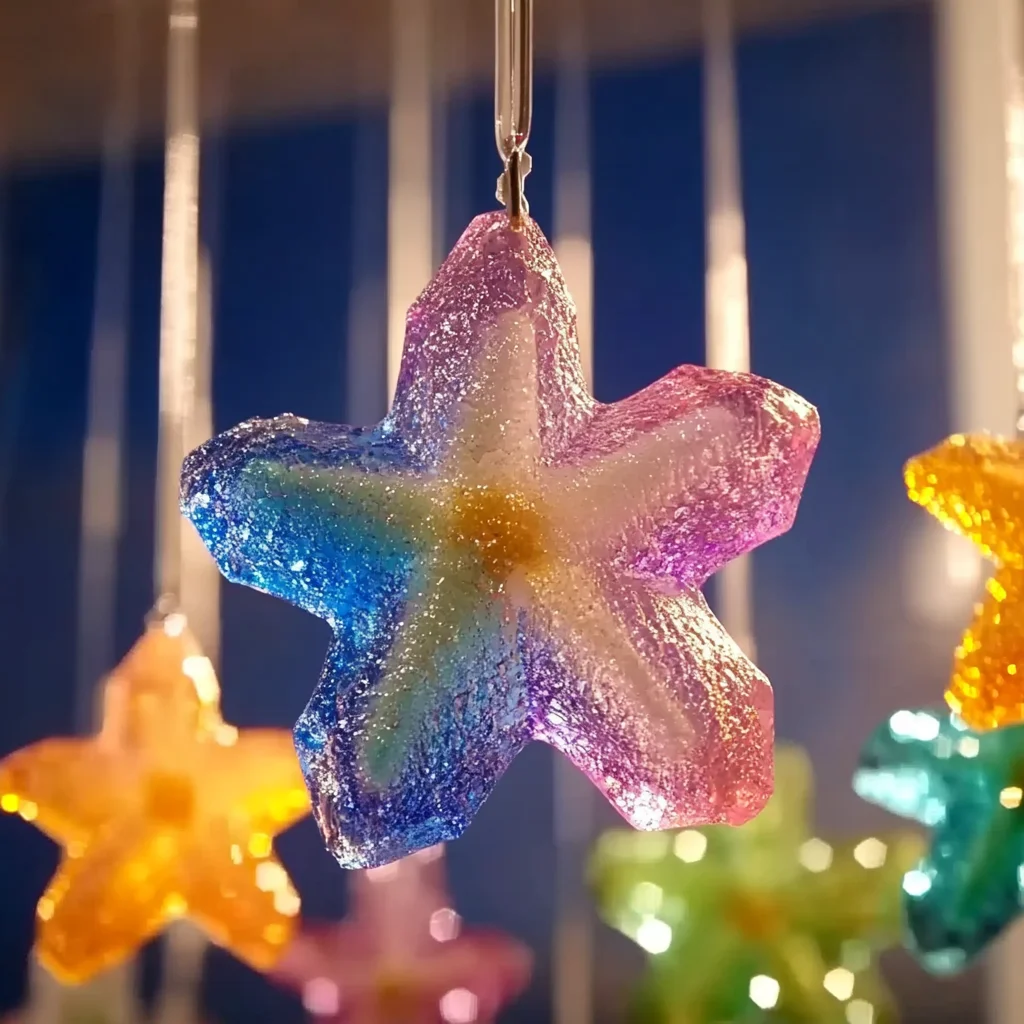
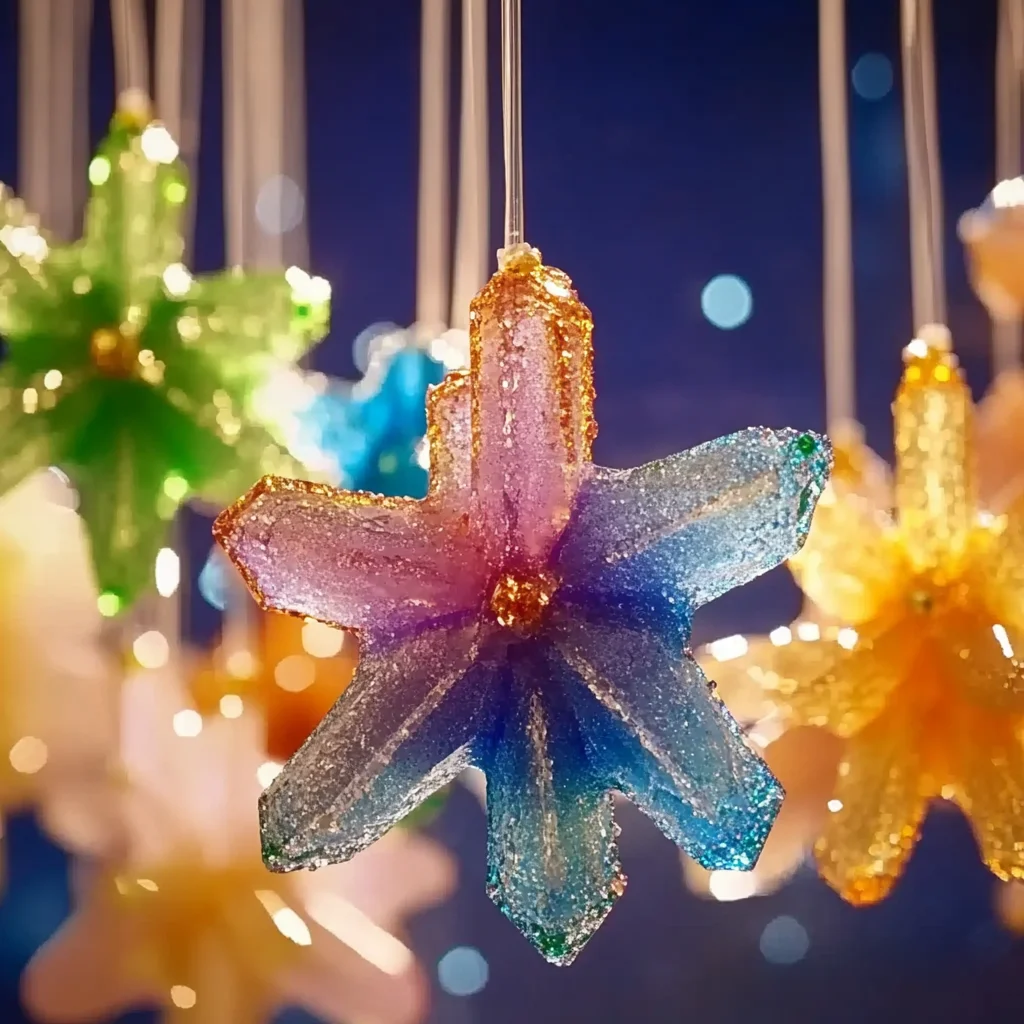
First, let’s get creative with those pipe cleaners! Grab a cookie cutter (star shapes are super popular and look amazing when crystallized, but feel free to use any shape you like!). Bend the pipe cleaners around your cookie cutter to form your desired shapes. Trim off any excess pipe cleaner. You can make multiple shapes from each pipe cleaner, so repeat this until you’ve used all six. I like to twist the ends of the pipe cleaner together securely to make sure they hold their shape.
-
Prep for Suspension
Now, take one piece of string and tie it securely around the top of each pipe cleaner shape you made. Make sure the knot is tight! Then, take the other end of the string and tie it to the middle of a popsicle stick. You want enough string so that when the popsicle stick rests across the top of your jar, the pipe cleaner shape hangs down into the jar without touching the bottom. Repeat this for all your shapes. These popsicle sticks are going to be our “hangers”!
-
Set Up the Crystal Bath
Carefully place your pipe cleaner shapes into your mason jars. Rest the popsicle stick across the rim of the jar opening so the shapes are suspended inside. Now, for the crucial part: in a separate bowl or container, carefully pour in the 3 cups of boiling water. Add the 3/4 cup of Borax to the hot water. Stir, stir, stir until all the Borax is completely dissolved. It’s important that it’s fully dissolved for the best crystal growth. This is a bit like making a super-saturated sugar solution, similar to when I make my simple violet sugar – the key is dissolving everything thoroughly!
-
Let the Magic Unfold
Carefully pour the Borax solution into the mason jars, making sure your pipe cleaner shapes are fully submerged in the liquid. Now comes the waiting game! Place the jars in a spot where they won’t be disturbed – a shelf or a quiet table is perfect. Leave them undisturbed for at least 12 to 24 hours. You’ll start to see tiny crystals forming and clinging to your pipe cleaner shapes. It’s truly fascinating to watch!
-
Admire Your Handiwork
After 12-24 hours, gently lift the popsicle sticks out of the jars. Your crystals should have grown beautifully! Carefully remove the crystal-covered shapes from the solution and place them on a paper towel or a plate to dry. Be gentle, as the crystals can be a little fragile.
Substitutions & Additions
Want to customize your crystal creations even more? I love experimenting with this! You can:
- Add Food Coloring: For super vibrant crystals, add a few drops of food coloring to the Borax solution before pouring it into the jars. Try different colors for different jars! It’s a similar effect to how food coloring makes my easy rainbow crystal jelly cake so fun.
- Use Different Shapes: Instead of pipe cleaners, you can try bending wire hangers or even using small, non-plastic toys as your base.
- Experiment with Other Solutions: While Borax is the classic, you can also experiment with Epsom salts or alum for different crystal formations.
- Glitter Time: For an extra sparkly touch, add some fine glitter to the Borax solution.
Tips for Success
A few little tricks can make your crystal growing experience even better:
- Water Temperature Matters: Using boiling water is crucial for dissolving the Borax completely.
- Don’t Disturb the Jar: The more you move the jar, the more likely you are to disrupt the crystal growth process. Patience is key!
- Clean Jars are Best: Start with clean mason jars to avoid any impurities affecting your crystals.
- Protect Your Surface: It’s always a good idea to place a tray or old newspaper under your jars in case of any spills, especially when dealing with boiling water.
- Prep Ahead: You can bend your pipe cleaner shapes and tie the strings the day before you plan to mix the solution.
How to Store Your Crystal Creations
Once your beautiful crystals are dry, you can display them! They’re quite delicate, so it’s best to keep them somewhere they won’t be bumped. A clear display box or a shelf away from traffic is ideal. They don’t “go bad” in the traditional sense, but they can accumulate dust over time. You can gently dust them with a soft brush if needed.
Frequently Asked Questions
-
Is this experiment safe for kids?
With adult supervision, yes! Borax can be irritating if ingested or if it gets into eyes, so it’s important for an adult to handle the boiling water and the Borax solution. Make sure children don’t touch their eyes after handling the materials.
-
How long does it take for crystals to grow?
You’ll start to see crystals forming within a few hours, but the best growth happens between 12 to 24 hours. You can leave them longer for even more substantial crystals!
-
Can I reuse the Borax solution?
While you can technically reuse it, the solution will have lost some of its Borax and may contain impurities from the first batch. For the best results, it’s recommended to make a fresh batch each time.
This crystal growing experiment is a fantastic way to explore science and create something truly beautiful. It reminds me a bit of the joy I get from making simple, yet delightful treats like my easy cake mix toffee bars or even whipping up a fun drink like my homemade rainbow mudslide frappuccino – it’s all about the creative process and the satisfying result!
If you loved this fun DIY, be sure to follow us on Pinterest for even more exciting projects and recipes!
Grow Your Own Sparkly Crystals
Equipment
- Cookie cutters
- Popsicle sticks
- Mason jars or tall glasses
- Separate bowl or container
- Paper towel or plate
- Soft brush (for dusting)
Ingredients
For the Crystal Growth
- 3 cups boiling water Handle with care!
- 3/4 cup Borax Found in laundry aisle
- 6 pipe cleaners Any color, cut to shape
- 2 pieces string Approx. 12 inches each
Optional Additions
- few drops food coloring For colored crystals
- a little fine glitter For extra sparkle
Instructions
- Step 1: Shape Your Sparkles Bend pipe cleaners around a cookie cutter to form shapes. Trim excess and twist ends securely.
- Step 2: Prep for Suspension Tie one end of a string to each pipe cleaner shape. Tie the other end of the string to the middle of a popsicle stick, ensuring the shape hangs into a jar without touching the bottom.
- Step 3: Set Up the Crystal Bath Place pipe cleaner shapes in jars, resting popsicle sticks across the rims. In a separate container, carefully pour 3 cups boiling water. Add 3/4 cup Borax and stir until completely dissolved.
- Step 4: Let the Magic Unfold Carefully pour the Borax solution into the jars, submerging the pipe cleaner shapes. Place jars in a quiet, undisturbed spot for 12 to 24 hours to allow crystals to form.
- Step 5: Admire Your Handiwork Gently lift the popsicle sticks out of the jars. Carefully remove the crystal-covered shapes and place them on a paper towel or plate to dry.