Hey there, baking buddy! As soon as the leaves start to turn and there’s that crisp, exciting chill in the air, my mind immediately jumps to one thing: Halloween! There’s just something magical about this time of year, isn’t there? From carving pumpkins to picking out the perfect costume, it’s a season filled with nostalgic joy and a sprinkle of playful spookiness. And what better way to celebrate than with some homemade treats that are as fun to make as they are to eat?
Today, I’m sharing a recipe for Halloween Skeleton Cookies that will have everyone grinning from ear to ear. Forget complicated, time-consuming baking projects – these cookies are incredibly easy, delightfully quick to decorate (once you get the hang of it!), and oh-so-memorable. You’ll be whipping up a whole graveyard of cute skeletons in no time, and trust me, they’ll disappear even faster! Just like whipping up a batch of easy Christmas pinwheel cookies for the winter holidays, these Halloween treats are all about spreading joy and making sweet memories with minimal fuss.
Why You’ll Love Halloween Skeleton Cookies
- Fast: The hands-on time is super quick, especially if you prep the dough ahead.
- Easy: With simple ingredients and straightforward steps, even beginner bakers can master these.
- Giftable: Box them up for a friendly Halloween treat or a thoughtful hostess gift!
- Crowd-pleasing: Both kids and adults adore these fun, delicious sugar cookies.
Ingredients
Gathering your ingredients is the first step to any baking adventure! Here’s what you’ll need for these adorable skeletons, along with a few friendly notes:
- 1 ½ cups granulated sugar: Our sweet base for perfectly golden cookies.
- 1 cup unsalted butter, softened: Make sure it’s nice and soft, but not melted, for that dreamy creamy texture when you beat it with the sugar.
- 2 large eggs: They help bind everything together and give our cookies structure.
- 1 ½ teaspoons vanilla extract: Classic, warm, and comforting – a must-have in any sugar cookie.
- 1 ½ teaspoons almond extract: This is my secret weapon! Almond extract adds a little something extra special and really takes these cookies from good to absolutely fantastic. Don’t skip it if you can help it!
- 3 ½ cups all-purpose flour: The backbone of our cookie dough!
- 1 teaspoon baking powder: Just enough to give our cookies a lovely lift without making them cakey.
- ½ teaspoon salt: A pinch of salt balances the sweetness and enhances all those lovely flavors.
- 2 tablespoons confectioners’ sugar (for dusting): This is for rolling out the dough – it helps prevent sticking without adding extra granulated sugar that could alter the texture.
For the Icing:
- 1 cup confectioners’ sugar: The base for our smooth, white skeleton icing.
- 2 teaspoons milk, plus additional as needed: Start with 2 teaspoons, and have a little extra on hand to adjust consistency.
- 2 teaspoons light corn syrup, or more as needed: This is key for that glossy finish and helps prevent the icing from being too brittle.
- ¼ teaspoon vanilla extract: A little extra vanilla for flavor in our icing!
- 1 (1.5 ounce) tube black decorating gel: The easiest way to draw those cute skeleton faces!
How to Make Halloween Skeleton Cookies
Alright, let’s get these ghoulishly good treats baking! Follow these simple steps and you’ll be a Halloween cookie master in no time.
1. Prepare the Dough: Grab a large mixing bowl and your electric mixer. You’re going to cream together the granulated sugar and that lovely softened butter until it’s light, fluffy, and looks like a dream. Next, beat in your eggs, the 1 ½ teaspoons of vanilla extract, and that wonderful almond extract until everything is beautifully combined. It’ll smell amazing already!
2. Combine Dry Ingredients: In a separate medium bowl, whisk together your flour, baking powder, and salt. Giving them a good whisk ensures everything is evenly distributed. Now, gradually add this dry mixture to your wet ingredients, mixing until everything is just combined and a soft, pliable dough forms. Be careful not to overmix here – that’s the secret to tender cookies!
3. Chill Out!: This step is crucial for perfect cut-out cookies! Wrap your dough tightly in plastic wrap and pop it into the refrigerator for at least 3 to 4 hours. Honestly, if you can, let it chill overnight – it makes rolling so much easier and helps the cookies hold their shape better. This foresight is also what makes these cookies feel less like a rush and more like a delightful project, similar to how I plan my meals in advance like my easy one-pan garlic butter beef and rice for busy weeknights.
4. Bake the Cookies: Time to preheat that oven! Set it to 350°F (175°C). While it’s heating up, line two baking sheets with parchment paper – this prevents sticking and makes cleanup a breeze.
5. Roll and Cut: On a clean work surface, sprinkle a light dusting of those 2 tablespoons of confectioners’ sugar. This is my little trick to keep the dough from sticking while adding to the tender texture. Roll out your chilled dough to a ¼-inch thickness. Now for the fun part! Grab your gingerbread man cookie cutter and start cutting out your little skeletal figures. Carefully transfer them onto your prepared baking sheets, leaving a little space between each one.
6. Bake to Perfection: Pop those baking sheets into the preheated oven and bake for 8 to 10 minutes, or until the edges are just lightly golden. You don’t want them too dark! Once baked, carefully transfer the hot cookies from the baking sheets to wire racks to cool completely. This usually takes about 20 minutes, but you want them totally cool before icing.
7. Prepare the Icing: While your cookies are cooling, let’s make that gorgeous white icing! In a small bowl, whisk together 1 cup of confectioners’ sugar and 2 teaspoons of milk until smooth. Then, beat in 2 teaspoons of light corn syrup and ¼ teaspoon of vanilla extract. Keep whisking until the icing is beautifully smooth and glossy. If it seems a little too thick, just add a few extra drops of corn syrup or milk, one at a time, until you hit that perfect consistency for piping.
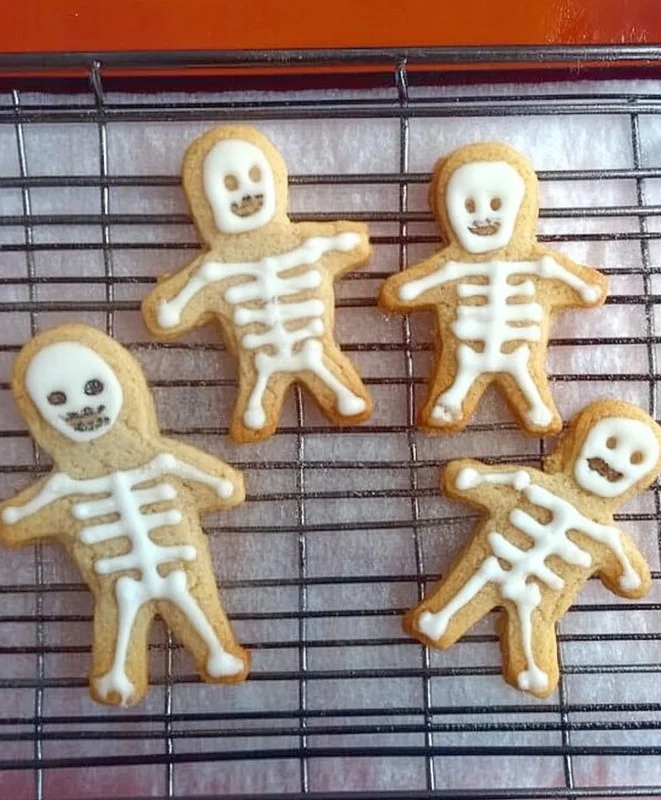
8. Decorate the Cookies (White Icing): This is where the magic happens! Spoon your white icing into a piping bag fitted with a small, plain tip. For each cookie, first draw and fill a circular shape at the head portion to create the skull. Then, for the body, pipe a skeleton design – I like to do three horizontal lines to represent the ribs. Don’t worry about perfection; rustic skeletons are just as charming!
9. Let the White Icing Dry: This step is super important, my friend! Allow the white icing to dry completely on your cookies. This typically takes about 2 hours, but honestly, for the best results and to prevent any smudging, I recommend letting them dry overnight. Patience is a virtue, especially in cookie decorating!
10. Decorate the Cookies (Black Gel): Once your white icing is fully, truly dry, it’s time for the final touches! Grab your tube of black decorating gel. Use it to draw spooky or silly eyes, a nose, and a mouth on each skull. Let your creativity run wild! After adding the black details, allow the gel to dry again for about 1 hour before you store or serve your masterpieces.
Substitutions & Additions
The beauty of a classic sugar cookie is how easily you can make it your own! Here are some ideas to shake things up:
- Dough Shortcuts: In a pinch, you can absolutely use a good quality store-bought sugar cookie dough. Just follow the package directions for baking and then jump straight to the decorating steps!
- Flavor Twists: Swap out the almond extract for lemon extract for a brighter cookie, or even a touch of peppermint extract for a festive fall flavor.
- Icing Alternatives: If you want super crisp lines and an even more professional look, you could use royal icing. For ultimate simplicity, you can buy pre-made white and black icing tubes at the store.
- Color Me Spooky: Feeling adventurous? Divide your white icing and tint it with a few drops of gel food coloring to make purple, orange, or green skeletons!
- Extra Sparkle: Before the white icing dries, sprinkle a little edible glitter for some extra ghostly glam! You can also use small candy eyeballs instead of piping them with black gel for an even more cartoonish look.
Tips for Success
Making these cookies is a breeze, but a few pointers can make them even better:
- Don’t Skip the Chill Time: I cannot stress this enough! Chilling the dough is critical. It firms up the butter, making the dough easier to roll and preventing your skeletons from spreading too much in the oven.
- Mind the Thickness: Rolling your dough to an even ¼-inch thickness ensures all your cookies bake at the same rate and have a consistent, tender bite.
- Don’t Overbake: Keep a close eye on your cookies! You want them just lightly golden around the edges, not dark brown. Overbaked sugar cookies can be dry and crumbly.
- Icing Consistency is Key: If your white icing is too thick, it’ll be hard to pipe smoothly. Too thin, and it’ll run right off the cookie! Adjust with tiny amounts of milk or corn syrup until it flows nicely but holds its shape.
- Patience with Drying: Seriously, let that white icing dry completely before adding the black details. If you rush it, the black gel will bleed into the white, and your skeletons might look a little… smudged.
- Prep Ahead for Sanity: You can make the cookie dough up to 3 days in advance and keep it wrapped in the fridge. You can also bake the cookies entirely and store them undecorated in an airtight container for a few days before you get to the fun part. These cookies are a fantastic way to get everyone involved in the kitchen, much like making Kool-Aid gummy treats – pure, simple fun! If you’re looking for more fun Halloween ideas, you might also adore these spooky cute peanut butter spider cookies!
How to Store Halloween Skeleton Cookies
Once your adorable skeleton cookies are fully dry and ready, here’s how to keep them fresh:
- At Room Temperature: Store decorated cookies in an airtight container at room temperature for up to 3-5 days. For best results, place parchment paper between layers to prevent sticking and smudging.
- In the Refrigerator: If you live in a very warm climate, you can store them in an airtight container in the fridge for up to a week. Just be aware that refrigeration can sometimes slightly alter the texture of sugar cookies.
- Freezing Baked (Undecorated) Cookies: You can bake the cookies, let them cool completely, and then freeze them in an airtight container or freezer bag for up to 3 months. Thaw them at room temperature before decorating.
- Freezing Dough: You can also wrap the raw cookie dough tightly in plastic wrap and then again in foil, and freeze for up to 3 months. Thaw in the refrigerator overnight before rolling and baking.
FAQs
Q: Can I use store-bought cookie dough for this recipe?
A: Absolutely! If you’re short on time, a good quality pre-made sugar cookie dough will work wonderfully. Just follow the package instructions for baking, then come back to our decorating steps!
Q: How can I make these even faster?
A: The biggest time-savers are using store-bought dough and pre-made icing tubes. You can also do the dough chilling overnight to break up the process, making it feel less rushed on baking day.
Q: What if my white icing is too runny or too thick?
A: No worries! If it’s too thick, add milk or corn syrup a drop or two at a time, mixing well after each addition, until you reach your desired consistency. If it’s too runny, gradually add more confectioners’ sugar, a tablespoon at a time, until it thickens up.
Q: Can I make these ahead of time for a Halloween party?
A: Yes! You can make the dough several days in advance and keep it chilled. Once baked and fully decorated, the cookies will stay fresh in an airtight container at room temperature for 3-5 days. They’re perfect for party prep!
These Halloween Skeleton Cookies are more than just a treat; they’re a fun activity, a sweet gift, and a delightful way to bring some spooky cheer to your home. So roll up your sleeves, embrace the season, and get ready to create some deliciously adorable bony friends! Happy baking!
For more delicious recipes and fun ideas, be sure to follow us on Pinterest!

Halloween Skeleton Cookies
Equipment
- Large mixing bowl
- Electric mixer
- Medium bowl
- Plastic wrap
- Refrigerator
- oven
- Baking sheets
- parchment paper
- Gingerbread man cookie cutter
- Wire racks
- Small bowl
- Piping Bag
- Small Plain Tip
Ingredients
For the Cookies
- 1.5 cups granulated sugar
- 1 cup unsalted butter softened
- 2 large eggs
- 1.5 tsp vanilla extract
- 1.5 tsp almond extract
- 3.5 cups all-purpose flour
- 1 tsp baking powder
- 0.5 tsp salt
- 2 tbsp confectioners’ sugar for dusting
For the Icing
- 1 cup confectioners’ sugar
- 2 tsp milk plus additional as needed
- 2 tsp light corn syrup or more as needed
- 0.25 tsp vanilla extract
- 1 tube black decorating gel 1.5 ounce
Instructions
- Step 1: Prepare the Dough: In a large mixing bowl, cream together the granulated sugar and softened butter with an electric mixer until light and fluffy. Beat in eggs, 1 ½ teaspoons vanilla extract, and almond extract until combined.
- Step 2: Combine Dry Ingredients: In a separate medium bowl, whisk together the flour, baking powder, and salt. Gradually add this dry mixture to the wet ingredients, mixing until just combined and a soft dough forms. Do not overmix.
- Step 3: Chill Out!: Wrap the dough tightly in plastic wrap and refrigerate for at least 3 to 4 hours, or preferably overnight, to help it hold its shape.
- Step 4: Bake the Cookies: Preheat oven to 350°F (175°C). Line two baking sheets with parchment paper.
- Step 5: Roll and Cut: Lightly dust a clean work surface with 2 tablespoons of confectioners’ sugar. Roll out the chilled dough to a ¼-inch thickness. Use a gingerbread man cookie cutter to cut out shapes and carefully transfer them to the prepared baking sheets, leaving space between each.
- Step 6: Bake to Perfection: Bake for 8 to 10 minutes, or until the edges are just lightly golden. Transfer hot cookies to wire racks to cool completely (about 20 minutes).
- Step 7: Prepare the Icing: While cookies cool, whisk together 1 cup confectioners’ sugar and 2 teaspoons milk in a small bowl until smooth. Beat in 2 teaspoons light corn syrup and ¼ teaspoon vanilla extract until glossy. Add extra drops of corn syrup or milk if needed to adjust consistency.
- Step 8: Decorate the Cookies (White Icing): Spoon white icing into a piping bag with a small, plain tip. For each cookie, draw and fill a circular skull shape at the head, then pipe three horizontal lines for the ribs to create a skeleton design.
- Step 9: Let the White Icing Dry: Allow the white icing to dry completely on the cookies, which typically takes about 2 hours, or ideally overnight, to prevent smudging.
- Step 10: Decorate the Cookies (Black Gel): Once the white icing is fully dry, use the black decorating gel to draw eyes, a nose, and a mouth on each skull. Allow the black gel to dry for about 1 hour before storing or serving.