Oh, friend, do you ever get that warm, fuzzy feeling when you think about cozy winter evenings and homemade treats? There’s something truly magical about baking (or in this case, not baking!) up a little bit of joy to share with loved ones. Today, I’m so excited to share a recipe that’s going to capture all that holiday cheer and more: Melted Snowman Fudge!
This isn’t just any fudge; it’s a delightful, whimsical creation that looks like a happy little snowman who’s decided to take a very comfortable (and delicious) nap in a pool of creamy white fudge. It’s incredibly easy, surprisingly quick, and guaranteed to bring smiles to everyone’s faces. Whether you’re looking for a fun kitchen project with the kids, a last-minute party contribution, or a charming gift, this recipe has you covered.
Why You’ll Love Melted Snowman Fudge
- Fast: From start to chill, this recipe comes together in a flash.
- Easy: No complicated techniques, no candy thermometer needed! Just melt, mix, and decorate.
- Giftable: These adorable squares make the sweetest homemade gifts for teachers, neighbors, or anyone who needs a little pick-me-up.
- Crowd-pleasing: Who can resist a cute, creamy, melt-in-your-mouth treat?
Ingredients
Gathering your ingredients is half the fun! Here’s what you’ll need for these adorable little guys:
- 2 ⅔ cups white chocolate chips: Opt for good quality chips here, as they really make up the base flavor of your fudge.
- 14 ounce can sweetened condensed milk: This is the magic ingredient that gives your fudge that irresistible creamy texture. Don’t confuse it with evaporated milk!
- ½ tablespoon vanilla extract: If you want your fudge to be super bright white, a clear vanilla extract is your secret weapon. Otherwise, regular vanilla works just fine and adds a lovely flavor.
- Pinch of salt: Just a tiny bit to balance the sweetness and bring out all those delicious flavors.
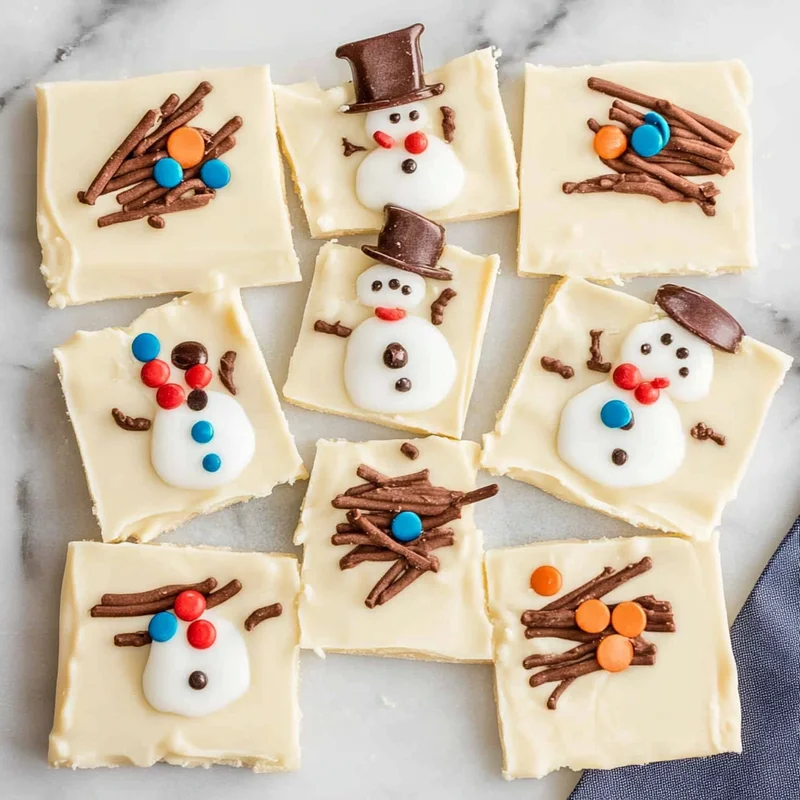
- 12 Mini Reese’s Peanut Butter Cups: These are going to be our snowman hats!
- 12 Orange sprinkles: Choose small, thin ones to create those cute little carrot noses.
- 24 Stick pretzels: Grab the thin kind for delicate snowman arms.
- 24 Mini chocolate chips: Perfect for bright, sparkly snowman eyes.
- 36 Mini red M&Ms (or other small round red candies): These will be our charming snowman buttons. Feel free to use other colorful mini candies if red isn’t your jam!
How to Make Melted Snowman Fudge
Alright, let’s get into the kitchen and make some magic! You’ll be amazed at how quickly this comes together.
- Prep Your Pan: First things first, grab a 9×13-inch baking pan. Line it with foil or parchment paper, making sure the edges extend up the sides. This little trick is going to make removing your set fudge a breeze! If you’re using foil, a quick spray with nonstick cooking spray will ensure nothing sticks.
- Decorations First!: This is a super important step, my friend. The fudge sets quickly, so you’ll want all your snowman decorations ready to go before the fudge is even out of the microwave. Trust me on this one!
- Hats Off (and On!): For each snowman hat, you’ll need one Mini Reese’s Peanut Butter Cup. Carefully cut each cup in half. Then, place the two halves on top of each other to create that adorable little top hat shape. A quick personal tip: chilling the Reese’s cups in the fridge for about 10-15 minutes before cutting can make them much easier to slice neatly.
- Tiny Arms: Take each pretzel stick and gently break it in half. These shorter pieces will become your snowman’s little arms.
- Melt the Magic: In a large, microwave-safe bowl, combine your white chocolate chips and the can of sweetened condensed milk. Pop it into the microwave on high for 1 minute, then take it out and give it a good stir.
- Keep Melting: Continue microwaving in 30-second intervals, stirring thoroughly after each, until most of the chips are melted. Then, keep stirring until any stubborn chips are fully incorporated and you have a beautifully smooth, glossy fudge mixture. Don’t overdo it in the microwave; stirring often is key!
- Flavor Boost: Stir in your vanilla extract and that little pinch of salt. Give it one last good stir to combine everything perfectly.
- Decorate, Decorate, Decorate!: Immediately pour the warm fudge mixture into your prepared pan. Now for the fun part! Swiftly arrange your prepared snowman decorations onto the warm fudge. Think about where you’ll cut your individual pieces later and space out your melted snowmen accordingly. Place the Reese’s hats, pretzel arms, orange sprinkles for noses, mini chocolate chips for eyes, and the mini red M&Ms for buttons. This part is so much fun, especially if you have little helpers!
- Chill Out: Once all your snowmen are adorned, pop the pan into the refrigerator. Let it chill for at least 4 hours, or until the fudge is completely firm. Patience is a virtue when waiting for deliciousness!
- Time to Cut: Once the fudge is firm, lift it out of the pan using the foil or parchment paper handles. Place it onto a clean cutting board.
- Slice and Serve: Using a sharp knife, carefully cut around each snowman decoration to create individual, perfectly portioned fudge squares. If you’re loving how simple this fudge is, you might also want to try our Easy 3-Ingredient Lemon Fudge for a zesty twist!
Substitutions & Additions
Want to get even more creative with your melted snowmen? Here are some ideas:
- Chocolate Choices: While white chocolate is classic here, you could try using milk or dark chocolate chips for a chocolate snowman. Just be aware the decorations might not pop as much!
- Different Noses: Instead of orange sprinkles, you could use tiny pieces of dried apricot or even a dab of orange icing for the snowman’s nose.
- Festive Flavors: Add a ¼ teaspoon of peppermint extract along with the vanilla for a minty twist, or a tiny splash of almond extract for a different dimension.
- Candy Cane Crush: Fold in some crushed candy canes after the fudge is melted for an extra festive crunch and flavor.
- Extra Sparkle: A light dusting of edible glitter over the finished fudge would add a truly magical touch! This fudge isn’t just easy, it’s incredibly giftable! Imagine wrapping up these adorable treats alongside some Peppermint Snowball Cookies or even our Easy Christmas Pinwheel Cookies for a festive homemade goodie basket.
Tips for Success
To ensure your Melted Snowman Fudge turns out perfect every time, keep these tips in mind:
- Prep is Key: I really can’t stress this enough – have ALL your decorations ready before the fudge is out of the microwave. Once that warm, delicious fudge is in the pan, you need to work quickly!
- Don’t Over-Microwave: White chocolate can seize or burn easily. Always microwave in short bursts and stir well between each. Residual heat will melt any remaining chips.
- Quality Matters: Good quality white chocolate chips will yield a smoother, richer-tasting fudge.
- Sharp Knife: A sharp, non-serrated knife makes cutting clean lines around your snowmen much easier. You can even run your knife under hot water and dry it before each cut for an extra clean slice.
- Clear Vanilla for Purity: If you’re aiming for that pristine white snowman background, clear vanilla extract is your friend. Regular vanilla will give it a slight cream or ivory tint.
- Chilling the Reese’s: As mentioned, a quick chill makes those Mini Reese’s cups easier to cut for the hats.
How to Store Melted Snowman Fudge
Once your adorable fudge is ready, you’ll want to store it properly to keep it fresh and delicious.
- Airtight is Best: Store the fudge in an airtight container at room temperature for up to 1 week.
- Refrigeration: If you prefer your fudge a bit firmer, or if your kitchen is particularly warm, you can store it in the refrigerator for up to 2 weeks. Just be sure to bring it closer to room temperature before serving for the best texture.
- Freezing: Fudge freezes surprisingly well! Wrap individual pieces tightly in plastic wrap, then place them in a freezer-safe bag or container. It can last in the freezer for up to 3 months. Thaw in the refrigerator overnight before serving.
FAQs
Got questions? I’ve got answers, friend!
Q: Can I use a different type of chocolate instead of white chocolate?
A: Absolutely! While the “melted snowman” effect is best with white fudge, you could certainly make this with milk or dark chocolate. Your snowman might just look like he’s taken a cozy dip in a chocolate pool!
Q: My fudge isn’t setting. What went wrong?
A: The most common culprit is not using sweetened condensed milk (sometimes people grab evaporated milk by mistake!) or not enough chilling time. Ensure you’re using the correct milk and give it plenty of time in the fridge.
Q: Can I get my kids involved in making this?
A: This is the perfect kid-friendly recipe! They can help unwrap candies, break pretzels, and especially love decorating the “melted” snowmen. Just be sure an adult handles the hot fudge mixture.
Q: How far in advance can I make this fudge for the holidays?
A: You can easily make this fudge a week in advance and store it in an airtight container at room temperature or in the fridge. It’s a fantastic make-ahead treat!
For more delicious and inspiring recipes, follow us on Pinterest!
Melted Snowman Fudge
Equipment
- 9x13-inch baking pan
- Foil or parchment paper
- Large microwave-safe bowl
- sharp knife
Ingredients
- 2 ⅔ cups white chocolate chips good quality chips recommended
- 14 ounce can sweetened condensed milk do not confuse with evaporated milk
- ½ tablespoon vanilla extract clear vanilla for super bright white fudge, otherwise regular works
- Pinch of salt
- 12 Mini Reese’s Peanut Butter Cups for snowman hats
- 12 Orange sprinkles small, thin ones for carrot noses
- 24 Stick pretzels thin kind, broken in half for snowman arms
- 24 Mini chocolate chips for snowman eyes
- 36 Mini red M&Ms or other small round red candies for snowman buttons
Instructions
- Step 1: Prep Your Pan: Grab a 9x13-inch baking pan. Line it with foil or parchment paper, making sure the edges extend up the sides. If using foil, a quick spray with nonstick cooking spray will ensure nothing sticks.
- Step 2: Decorations First!: Have ALL your snowman decorations ready to go before the fudge is even out of the microwave. The fudge sets quickly!
- Step 3: Hats Off (and On!): For each snowman hat, cut one Mini Reese's Peanut Butter Cup in half. Then, place the two halves on top of each other to create the top hat shape. Chilling the Reese's cups for 10-15 minutes before cutting can make them easier to slice neatly.
- Step 4: Tiny Arms: Take each pretzel stick and gently break it in half. These shorter pieces will become your snowman's arms.
- Step 5: Melt the Magic: In a large, microwave-safe bowl, combine your white chocolate chips and the can of sweetened condensed milk. Pop it into the microwave on high for 1 minute, then take it out and give it a good stir.
- Step 6: Keep Melting: Continue microwaving in 30-second intervals, stirring thoroughly after each, until most of the chips are melted. Then, keep stirring until any stubborn chips are fully incorporated and you have a beautifully smooth, glossy fudge mixture. Do not overdo it in the microwave; stirring often is key!
- Step 7: Flavor Boost: Stir in your vanilla extract and that little pinch of salt. Give it one last good stir to combine everything perfectly.
- Step 8: Decorate, Decorate, Decorate!: Immediately pour the warm fudge mixture into your prepared pan. Swiftly arrange your prepared snowman decorations onto the warm fudge, spacing them out for individual pieces. Place the Reese's hats, pretzel arms, orange sprinkles for noses, mini chocolate chips for eyes, and the mini red M&Ms for buttons.
- Step 9: Chill Out: Once all your snowmen are adorned, pop the pan into the refrigerator. Let it chill for at least 4 hours, or until the fudge is completely firm.
- Step 10: Time to Cut: Once the fudge is firm, lift it out of the pan using the foil or parchment paper handles. Place it onto a clean cutting board.
- Step 11: Slice and Serve: Using a sharp knife, carefully cut around each snowman decoration to create individual, perfectly portioned fudge squares.