Remember those magical Halloween nights, the crisp air, the excitement of trick-or-treating? There’s something so special about the treats that come with this time of year. And today, we’re diving into a recipe that’s not only adorable but surprisingly simple: Meringue Ghosts and Pumpkins! These sweet little treats are perfect for a Halloween party, a fun baking project with the kids, or just a delightful homemade candy to share.
Why You’ll Love Meringue Ghosts and Pumpkins
- Fast: Once you get the hang of it, these come together surprisingly quickly.
- Easy: Perfect for beginner bakers, no complicated techniques here!
- Giftable: Package them up in cute bags or boxes for the perfect Halloween party favor or neighborly treat.
- Crowd-pleasing: Who can resist a spooky little ghost or a grinning pumpkin? They’re a guaranteed hit with all ages.
Ingredients
Gather these simple ingredients, and you’ll be on your way to a sweet Halloween:
- 3 large egg whites, room temperature: This is key! Room temperature egg whites whip up fluffier and more stable.
- 1/4 teaspoon cream of tartar: This is your secret weapon for super stable meringue.
- Pinch kosher salt: Just a tiny bit to enhance all those sweet flavors.
- 3/4 cup sugar: Granulated sugar works best here for that perfect crisp texture.
- 1/2 teaspoon pure vanilla extract: For a hint of classic, comforting flavor.
- Green gel food coloring: To make those adorable pumpkin stems and leaves!
- Orange gel food coloring: For our cheerful pumpkins. Gel food coloring is best because it won’t water down your meringue.
- 1 tablespoon mini chocolate chips: The perfect little details for eyes, mouths, and spooky accents!
How to Make Meringue Ghosts and Pumpkins
Let’s get baking! This recipe is easier than you might think.
- Preheat your oven: Set it to a low 225°F. We’re baking these slowly and gently.
- Whip those whites: In a stand mixer with the whisk attachment, start whipping your egg whites on medium speed until they look foamy and start to form soft peaks. Add in your cream of tartar and salt. Now, crank up the speed to medium-high and gradually add the sugar, about a tablespoon at a time. Keep whipping until you have stiff, glossy peaks – this usually takes about 6 minutes. Don’t forget to mix in that lovely vanilla extract at the end!
- Prep your ghost batter: Carefully transfer about 1/4 cup of the white meringue to a small bowl. Stir in 2 drops of green gel food coloring until it’s evenly mixed. Pop this into a piping bag fitted with a small round tip. This will be for our pumpkin details!
- Get ready for the main event: Take half of your remaining plain white meringue and put it into a piping bag fitted with a large round tip. This is for your ghostly shapes.
- Orange you glad for pumpkins? Now, to the meringue still in the mixer bowl, add about 4 drops of orange gel food coloring. Mix it in until you have a lovely, vibrant orange. For that classic pumpkin look, take a toothpick or skewer and draw 3 or 4 lines lengthwise on the inside of another piping bag fitted with a large open star tip. Space these lines out evenly. Then, carefully spoon your orange meringue into this prepared piping bag. The lines will create a beautiful striped effect!
- Secure your parchment: Grab your baking sheet. Pipe a little dot of meringue in each of the four corners. This is our little trick to secure the parchment paper so it doesn’t slide around while you’re piping! Press a sheet of parchment paper onto these dots to hold it in place.
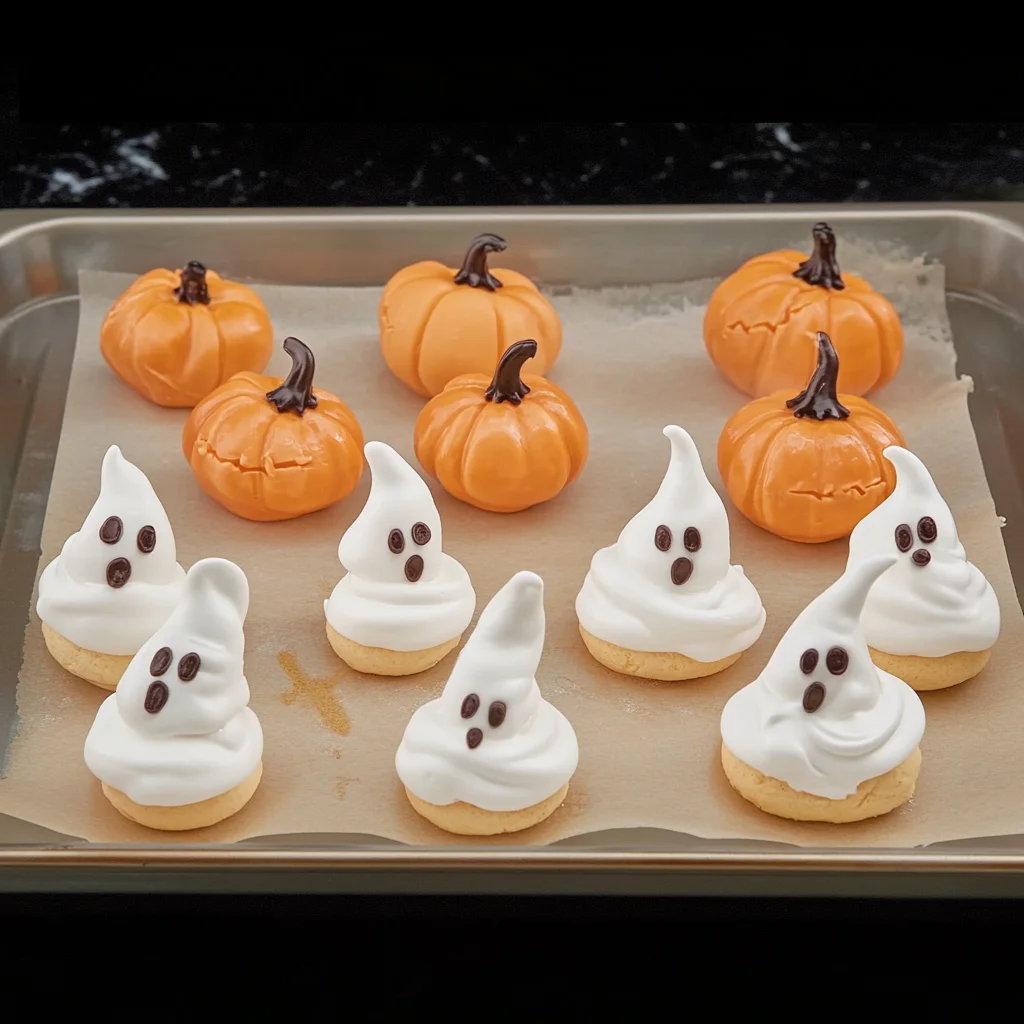
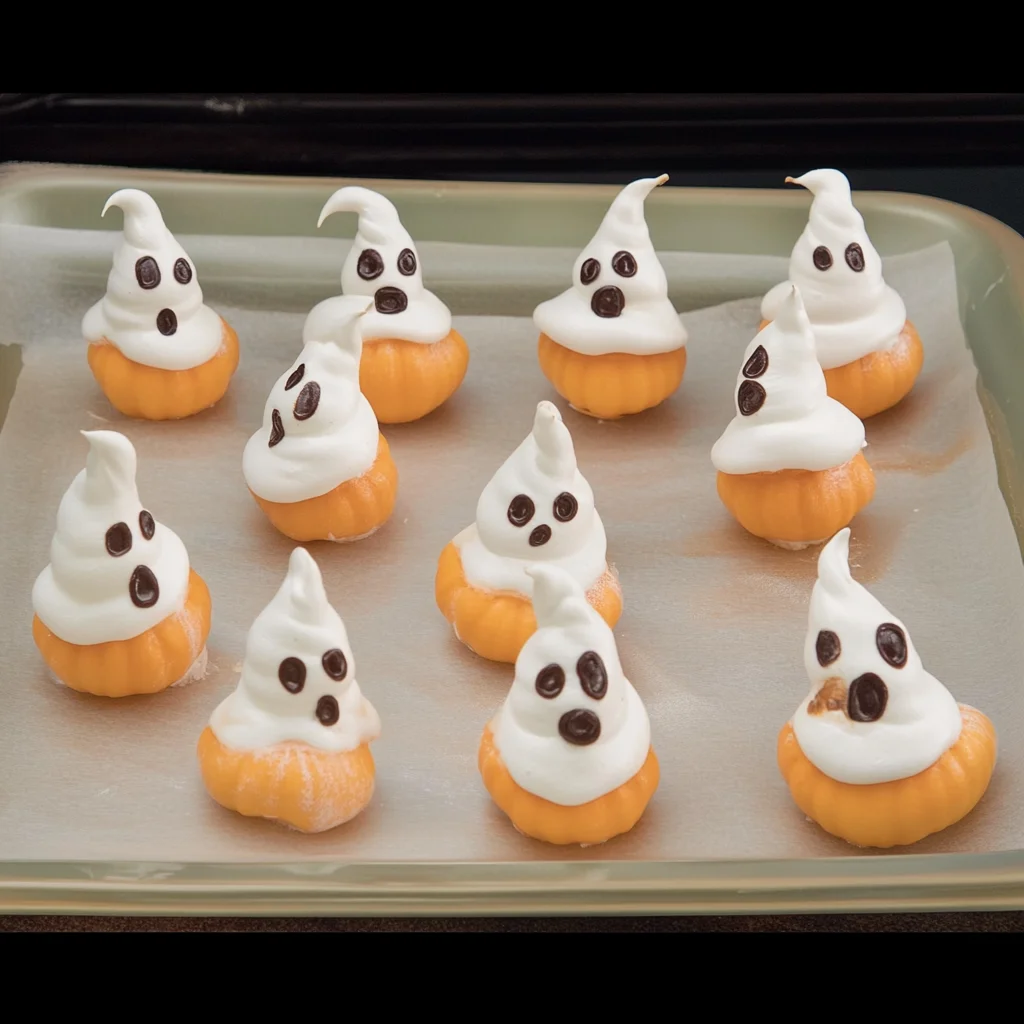
- Sculpting your ghosts: On the parchment paper, pipe your white meringue into little mounds. To give them a bit of character, you can slightly vary the pressure on your piping bag to create two or three stacked mounds for each ghost. Now for the faces! Gently press two mini chocolate chips, flat-side out, into the top of each ghost for eyes. For a few, you can press a mini chocolate chip, pointy-tip up, into the meringue for a little smile or a spooky mouth.
- Crafting your pumpkins: Using your striped orange meringue bag, pipe your pumpkin shapes onto the parchment paper. Hold the tip high enough to create a nice height for each pumpkin. For the final touch, pipe little leaves and stems on top of each pumpkin using your green meringue bag. If you’re going for a jack-o’-lantern look, press mini chocolate chips, pointy-tip up, into some pumpkins for eyes and a nose. You can arrange 4 or 5 chips in a line to create a classic jack-o’-lantern smile.
- The gentle bake: Bake your adorable creations for 1 hour. After an hour, turn off the oven, but leave the meringues inside with the oven door closed for another 2 hours and 30 minutes. This slow drying process ensures they become perfectly crisp and airy, just like they should be!
Substitutions & Additions
Feeling creative? Here are some fun ways to switch things up!
- Different Decorations: Instead of chocolate chips, try edible candy eyes for your ghosts, or small sprinkles for pumpkin details. You could even use a bit of black edible marker to draw faces before baking.
- Flavored Meringues: While vanilla is classic, you could experiment with a tiny drop of peppermint extract for a festive twist. Just be careful not to add too much, as it can affect the meringue’s stability. If you’re looking for other sweet recipes, you might enjoy these easy 3-ingredient lemon fudge for a citrusy kick.
- Rainbow Ghosts: For an extra pop of fun, divide your white meringue into a few bowls and add a tiny drop of different gel food colorings (pink, blue, purple) to create pastel ghosts!
- Mini Meringue Mushrooms: For a woodland-themed treat, pipe small rounds for the cap and a slightly taller, thinner one for the stem, then attach them.
Tips for Success
A few little tricks can make all the difference:
- Cleanliness is key: Make sure your mixing bowl and whisk attachment are absolutely grease-free. Even a tiny bit of grease can prevent your egg whites from whipping up properly.
- Room temperature is crucial: As mentioned, room temperature egg whites are essential for volume. If you forgot to take them out, place them in a bowl of warm water for a few minutes.
- Don’t rush the sugar: Adding the sugar gradually is important for creating a stable meringue.
- Patience during drying: The low oven temperature and extended drying time are what give meringues their signature crispness. Resist the urge to open the oven door too often! For other fun baking projects, consider trying some M&M Christmas cookies or perhaps some apricot sugar cookie hand pies.
- Humidity can be the enemy: Meringues don’t do well in humid weather. If it’s a very muggy day, you might find they don’t dry out as well.
How to Store Meringue Ghosts and Pumpkins
These little darlings are best enjoyed fresh, but you can store them!
Once completely cooled, store your meringue ghosts and pumpkins in an airtight container at room temperature. They can stay fresh for up to a week, though they are most crisp within the first few days. Avoid storing them in the refrigerator, as the moisture can make them lose their crispness.
FAQs
- Q: Can I make these without a stand mixer?
A: Yes! You can definitely use a hand mixer, but it will take a bit longer to whip the egg whites to stiff peaks. It’s a good arm workout, though! - Q: Why are my meringues soft and sticky?
A: This is usually due to humidity or not baking them long enough for them to dry out properly. Ensure your oven is at the correct temperature and allow ample drying time with the oven door closed. - Q: Can I make meringues ahead of time?
A: Absolutely! They store well in an airtight container at room temperature for about a week, making them a great make-ahead treat for parties.
Happy baking, and have a spooktacular Halloween! Don’t forget to follow us on Pinterest for more delicious recipes!
Meringue Ghosts and Pumpkins
Equipment
- Stand Mixer
- Whisk attachment
- Piping bags
- Small round tip
- Large round tip
- Large open star tip
- baking sheet
- parchment paper
- Toothpick or skewer
- Small bowls
Ingredients
Meringue Ghosts and Pumpkins
- 3 large egg whites room temperature
- 1/4 teaspoon cream of tartar
- Pinch kosher salt
- 3/4 cup sugar granulated
- 1/2 teaspoon pure vanilla extract
- Green gel food coloring Green gel food coloring for pumpkin stems and leaves
- Orange gel food coloring Orange gel food coloring for pumpkins
- 1 tablespoon mini chocolate chips for details
Instructions
- Step 1: Preheat your oven to 225°F.
- Step 2: In a stand mixer with the whisk attachment, whip egg whites on medium speed until foamy and soft peaks form. Add cream of tartar and salt. Increase speed to medium-high and gradually add sugar, about 1 tablespoon at a time. Whip until stiff, glossy peaks form (about 6 minutes). Mix in vanilla extract.
- Step 3: Transfer about 1/4 cup of white meringue to a small bowl. Stir in 2 drops of green gel food coloring. Place in a piping bag with a small round tip for pumpkin details.
- Step 4: Put half of the remaining white meringue into a piping bag with a large round tip for ghost shapes.
- Step 5: Add about 4 drops of orange gel food coloring to the meringue in the mixer bowl. Mix until vibrant orange. Prepare another piping bag with a large open star tip by drawing 3-4 lengthwise lines with a toothpick inside the bag. Spoon orange meringue into this bag.
- Step 6: Pipe small dots of meringue in the corners of a baking sheet and press parchment paper onto them to secure.
- Step 7: Pipe ghost shapes onto the parchment paper. Gently press two mini chocolate chips into the top for eyes. For some, press a chocolate chip pointy-tip up for a smile or mouth.
- Step 8: Pipe pumpkin shapes onto the parchment paper using the striped orange meringue bag. Pipe leaves and stems on top using the green meringue bag. Press mini chocolate chips into some pumpkins for eyes, nose, or a jack-o'-lantern smile.
- Step 9: Bake for 1 hour. Turn off the oven, leave meringues inside with the door closed for another 2 hours and 30 minutes.